- 250
- Posts
- 7
- Years
- Seen Apr 23, 2025
Have you ever wanted to add in custom music to your ROM hack, but never knew how to get it done, or even where to start? Well, this here thread has everything you'll ever need to know about adding and editing music in Pokeemerald!....or at least everything that I know at this moment in time. I've done my fair share of digging into how the music works in this game, and I feel like everyone else shouldn't need to dig through the same dirt that I had to.
I've split this into a few different segments, each segment being supported by the prior. So, if you already know about some of the initial stuff, you can just skip to whatever part you aren't so knowledgable on.
How the Game Reads Music
How To Turn a .mid File Into a .s File
The Different Types of Voices of the GBA
Voicegroups
Voice Envelopes
How to Add a Voicegroup
How to Add a Voice
.s Files
How to Work with .mid Files
How to Add a New Song To Your ROM
Editing a Song That's in Your ROM
Limitations of the GBA (And How to Get Past Some of Them)
With all of this knowledge at your disposal, you should be able to add all sorts of songs to your ROM hack. To wrap this tutorial up in a nice bow, I'll actually walk through adding a song into my own ROM hack, from beginning to end.
Full Step-by-Step Example
And with that.....I think I've said just about everything I can say on ROM music editing. If I come across any new insights on better methods or greater understanding on how different commands work, or if someone else posts something that explains an element of music hacking that I couldn't explain originally, I'll add it in to this tutorial. I hope this tutorial will spark a lot of people's musical interest and introduce all sorts of new songs into ROM hacks. I can't wait to see, or should I say hear, what you guys come up with!
I've split this into a few different segments, each segment being supported by the prior. So, if you already know about some of the initial stuff, you can just skip to whatever part you aren't so knowledgable on.
How the Game Reads Music
Spoiler:
If you were to look into Pret's pokeemerald decomp and go into
sound/songs/midi, you would see a ton of files. You'll see many .mid files in this folder, as well as possibly several .s files. The .mid files are what you would expect: midis. They can be edited by any old midi editor. However, the game does not actually look at this file when it plays music. The GBA only really cares about what's inside those .s files. If you were to open one of these files in a text editor (there are some .s files in sound/songs), you would see several lines of gibberish, with ".byte"s and "VOL"s and all sorts of stuff. This is assembly code for the GBA. You don't need to be a programmer to figure out what all of this does, though. By the end of this tutorial, you'll know what just about all of this stuff means and does. The important thing to take away from this section is this: the game looks at the .s file for how to play any piece of music or sound effect, not the .mid file. You can edit the .mid file all you want, but that won't change how the song sounds in the game one bit. Not to say the .mid file isn't important, but we'll get to that later.How To Turn a .mid File Into a .s File
Spoiler:
There is a program called "mid2agb". I have been told that it's not....shall we say....legal to own this software, as it is a Nintendo program. It can create a .s file out of a .mid. Lucky for you, it's already built into the ROM building process! All you have to do is slap your .mid file into
You'll want to type this in almost the exact same way for every .mid file you want turned into a .s file, and just change the name of the song based on your .mid filename. I'll point out a few things you might change depending on your particular song:
This section gives a reverb value to your song. "STD_REVERB" is equal to 50, as you will see if you look at the top of the
This section points out which voicegroup will be used with this song. Don't worry if you don't know what a voicegroup is yet, I explain what they are later on in this tutorial. Just know that this particular song would use voicegroup127 based off of what was inputted here. Changing the info to something like "-G090" would make the song use voicegroup090. Pretty straight forward.
This section sets the master volume of the song. That's basically it. It can't be any higher than 127, so keep that in mind.
This section sets the priority for the song. I'm not quite sure what purpose priority has for songs, but it is a thing. This song has a priority of 5, which is about as high as they come. You can leave this section out if you want your song to have 0 priority. Or, you can set it to a particular value, like 3, by making the section be "-P3".
Once the .s file has been created, you can open it up in a text editor of your choice and tweak these values and everything else in it as you see fit. Because of that fact, it's not incredibly critical that you perfectly nail the priority, volume, voicegroup, and reverb on your song before you even listen to it. Later on in this tutorial, I explain how to understand what's in the .s file, in case you end up needing to edit something in there. If you do want to update your .s file via
Now, I'm aware some older versions of pokeemerald don't come with
If you ever use
This will make it so that
sound/songs/midi, and then open songs.mk. Within this file, you'll see several sections of code, each one setting up the .s file of one of the .mid files within sound/songs/midi. All you have to do is add some info for the .mid file that you want to add to the game at the end of this file. For example, say your .mid file was named "epic_trainer_theme.mid". You might type something like this at the end:
Code:
$(MID_SUBDIR)/epic_trainer_theme.s: %.s: %.mid
	$(MID) $< $@ -E -R$(STD_REVERB) -G127 -v100 -P5
Code:
-R$(STD_REVERB)songs.mk file. If a song has reverb, 50 is usually the amount of reverb they use. You can leave this section out if you don't want your song to have reverb. You can also replace "$(STD_REVERB)" with a number if you don't want the reverb value to be exactly 50.
Code:
-G127
Code:
-v100
Code:
-P5Once the .s file has been created, you can open it up in a text editor of your choice and tweak these values and everything else in it as you see fit. Because of that fact, it's not incredibly critical that you perfectly nail the priority, volume, voicegroup, and reverb on your song before you even listen to it. Later on in this tutorial, I explain how to understand what's in the .s file, in case you end up needing to edit something in there. If you do want to update your .s file via
songs.mk, you'll need to first delete your original .s file, make the changes you want to make in songs.mk, and then build your ROM again.Now, I'm aware some older versions of pokeemerald don't come with
songs.mk, thus not having this built-in .mid to .s process. mid2agb can still be acquired, since the Internet is an awfully big place. If you are using one of these older versions of pokeemerald, you will need it, unless you plan to write each of your .s files by hand. If you look at some of the .s files already in pokeemerald, however, I'm sure you'll agree that that is not a good idea.If you ever use
make clean, all of the .s files in sound/songs/midi will be deleted. If you are like me and prefer making changes only in the .s file, you can avoid this problem by saving your .s files elsewhere and then copy them back in after running the command, or you can edit the Makefile by removing this line:
Code:
rm -f $(MID_SUBDIR)/*.smake clean doesn't delete your painstakingly-crafted .s files.The Different Types of Voices of the GBA
Spoiler:
Now, what exactly does the GBA use to make noises and such? Well, there are a few different categories of voices.
Square/Square2: These are 8-bit square waves. The square wave is the stereotypical 8-bit sound. There's a website that talks about all types of different waves used in video game music that you can look at, as well as some other aspects like voice envelopes, which I'll talk about later in this tutorial, if you want to dive a bit deeper. In short, Square/Square2 is what you often use to get that iconic 8-bit sound.
ProgrammableWave: This voice type is still technically 8-bit, but isn't limited to just the square wave. You can go into sound/programmable_wave_samples to see several .pcm files, which each represent one particular type of 8-bit sound that can be made. Some of them are pretty similar to each other, requiring a keen ear to notice any difference, while others are clearly different. You'll have to listen to each of them if you want to get a good grasp on which particular wave you'll want to use to create a certain sound. In short, ProgrammableWave creates a more unique 8-bit sound than the Square/Square2 waves.
Noise: This voice is mainly used for specific sound effects. It has a very static-y sound, so it can be used for crashing waves, applause, or gunshots, if manipulated properly. You won't often use this when making music, but who knows? Maybe you'll want to imitate some calming waves during part of a shoreline village's theme or something.
Directsound: Here's the real meat-and-potatoes of the GBA's music. Directsound voices are samples of real instruments. This is where the iconic french horn of the Hoenn soundtrack comes from. You've got guitars, drums, basses, strings, brass, and more in this type of voice. You'll most likely be using an awful lot of these voices in your songs, unless you are specifically going for a more classic 8-bit sound.
Voicegroups
Spoiler:
Every song in pokeemerald uses what is called a voicegroup. A voicegroup contains a list of instruments, or voices. You can see every voicegroup in pokeemerald by looking into
I admittedly don't know what ".align 2" does, but I assume it has something to do with formatting. This is followed by the particular name of the voicegroup, which is used when giving a certain song this particular set of instruments. Below this is a full collection of all of the instruments in the voicegroup. You will often see a lot of:
This is, as you may have inferred, the square wave voice. You may also see some of these:
Again, you've probably already figured out what each of these represent, if you're already aware of the different types of voices in the GBA. The "alt" and "no_resample" voices simply give off a slightly different sound compared to the normal ones. I think it has something to do with how hard these samples are compressed, but I'm not entirely sure on that. Sometimes using alt or no_resample sounds better, sometimes it sounds worse. It just takes some experimenting to figure out which version is the one for you.
Now, if you looked through a few of the voicegroups within pokeemerald, you may have noticed a couple voice types that I haven't yet mentioned, specifically
These are pointers towards previous voicegroups. For example, you may see this particular voice in a voicegroup:
This represents the trumpet voice. If you were to look at voicegroup007, you would see something along these lines:
As you can see, there are several trumpet samples. The numbers 60, 72, and 84 represent what pitch these samples start at. 60 is Cn3, 72 is Cn4, and 84 is Cn5. These are different octaves of the note C. voice_keysplit uses a keysplit table, and in the case with the trumpet, it uses KeySplitTable3. You can look at all of the keysplit tables in
But there is yet another type of keysplit: voice_keysplit_all. This is a simplified version of voice_keysplit. This takes all of the instruments within a particular voicegroup and smashes them all into one voice. A common example of this is:
This one voice represents the percussion of pokeemerald. If you look at voicegroup002, you'll see all sorts of drums, cymbals, wood blocks, and more. voice_keysplit_all takes each voice within voicegroup002 and assigns it to a particular note, with the first one being assigned to CnM2, the lowest note playable in pokeemerald, and then proceeding upwards until it reaches Gn8, the highest playable note. If you look at voicegroup002, and count all of the different samples, you'll see that it doesn't go all the way up to Gn8. However, it will just start taking samples from the next voicegroup in
Just to be clear about the difference between voice_keysplit and voice_keysplit_all, voice_keysplit takes all of the voices within the given voicegroup and, based on the given keysplit table, will choose to use one of those voices depending on what note is needed to be played. voice_keysplit_all takes all of the voices within the given voicegroup and assigns each voice to a particular note, and whenever that note is played, that voice assigned to that note makes it's normal, non-pitch shifted sound.
sound/voicegroups. (Shocking, I know) Some earlier versions of pokeemerald just have a single file for all of the voicegroups, which would be sound/voice_groups.inc. Within these voicegroups, you'll see a lot of instruments with some numbers and words scattered around. I'll explain what each of these things mean. First, you'll see something like:
Code:
	.align 2
voicegroup028::
Code:
voice_square_1
Code:
voice_square_1_alt
voice_square_2
voice_square_2_alt
voice_programmable_wave
voice_programmable_wave_alt
voice_noise
voice_noise_alt
voice_directsound
voice_directsound_alt
voice_directsound_no_resampleNow, if you looked through a few of the voicegroups within pokeemerald, you may have noticed a couple voice types that I haven't yet mentioned, specifically
Code:
voice_keysplit and voice_keysplit_all
Code:
voice_keysplit voicegroup007, KeySplitTable3
Code:
voicegroup007:: @ 8676AE4
	voice_directsound 60, 0, DirectSoundWaveData_sc88pro_trumpet_60, 255, 0, 193, 127  @ 8676AE4
	voice_directsound 60, 0, DirectSoundWaveData_sc88pro_trumpet_72, 255, 0, 193, 127  @ 8676AF0
	voice_directsound 60, 0, DirectSoundWaveData_sc88pro_trumpet_84, 255, 0, 193, 127  @ 8676AFC
	voice_square_1_alt 60, 0, 38, 2, 1, 0, 0, 0  @ 8676B08
	voice_square_1 60, 0, 0, 2, 0, 0, 15, 0  @ 8676B14
	voice_square_1 60, 0, 0, 2, 0, 0, 15, 0  @ 8676B20
voice_square_1 60, 0, 0, 2, 0, 0, 15, 0 @ 8676B2Csound/keysplit_tables.inc. These tables have data that decide which particular sample to use when a note is played by this keysplit voice. In short, voice_keysplit is capable of putting multiple instruments from a voicegroup into one voice, as long as you setup the keysplit table properly to choose between each instrument. You will be using these a lot, since trumpet, french horn, string ensemble, and several other common instruments follow this keysplit format.But there is yet another type of keysplit: voice_keysplit_all. This is a simplified version of voice_keysplit. This takes all of the instruments within a particular voicegroup and smashes them all into one voice. A common example of this is:
Code:
voice_keysplit_all voicegroup002sound/voice_groups.inc the further you go. This is true of all voicegroups if you reach beyond the end. Going back to voice_keysplit_all, each voice is played at their standard pitch, not being pitch shifted to match whatever note was supposed to be played like a normal voice would be. This works well for percussion, because percussion isn't meant to be a particular note. It just needs to make the sound that it makes.Just to be clear about the difference between voice_keysplit and voice_keysplit_all, voice_keysplit takes all of the voices within the given voicegroup and, based on the given keysplit table, will choose to use one of those voices depending on what note is needed to be played. voice_keysplit_all takes all of the voices within the given voicegroup and assigns each voice to a particular note, and whenever that note is played, that voice assigned to that note makes it's normal, non-pitch shifted sound.
Voice Envelopes
Spoiler:
Now, after one of those voice names like "voice_square_1" or "voice_directsound", you'll see a series of numbers, seperated by commas. Something like this:
These are what are called the voice's envelopes. These are values that can manipulate the sound of this one particular voice in this one particular voicegroup. You can see what these values mean if you look into
base_midi_key represents the particular note this voice starts in....at least I think. I initially thought that, if you were to change this value, it would change how the voice would sound in the GBA. Nearly every voice's base key is 60, which is Cn3. I thought that if you made this 59, for example, the GBA would consider Bn2 (the note immediately below Cn3) to be the normal pitch of the sample of this voice, and would then pitch-shift this voice up by one half step if it ever needed to play a Cn3. However, when I tested this, the voice sounded exactly the same. Thus, I don't really understand what this value does. Just make it 60.
pan represents "where" the sound comes from. When playing music through stereo speakers, you can make the music come more out of the left speaker rather than the right, or vice versa. Although this value can be changed mid-song, setting this value in a voicegroup will affect how this voice is naturally "placed" in relation to the speakers. This value is almost always 0.
sweep represents.....something. I guess. In musical terms, a "sweep" is a smooth motion through the entire audible spectrum. Based on that, I don't know what this value means. It's almost always 0, so that doesn't clear much up.
duty_cycle represents the ratio of time spent at the maximum of a wave to the time spent at the minimum of the wave. That may sound a bit confusing, but what it breaks down to is that it affects the timbre of the wave itself. This is only used by the Square/Square2 voices, since directsound and noise don't use a particular wave, and Programmable waves use an exact wave, which cannot be changed. This value actually varies a little in the voicegroups in pokeemerald, from 0 to 2. Tweak this value to see if you can get the wave to sound a way you like. Maybe even go beyond 2 to see if you can get some weird sounds!
The website I mentioned earlier about 8-bit waves talks about the following envelopes at the bottom of the webpage, in case you want to see an example of all of them in play.
attack represents the amount of time it takes for a note to get from it's current volume to a new volume. If this value is 0, the second a note is played by this voice, it is immediately at the new volume. If it's not 0, then the lower the value (lowest being 1), the longer the note takes to get to full volume. 255 is the highest value for attack, where the note almost instantly goes to full volume, but just not quite.
sustain represents what volume the note decays to after reaching its Attack volume. This allows a note to either gradually decrease or increase in volume. If this value is 255 (the max), then the notes from this voice will be at full volume after the decay. As you decrease this value, the note will decay to a quieter and quieter volume. If it's 0, depending on how long a note is and the decay value, the note may become silent before it plays through its full length. If the attack and sustain values are equal, the volume will not change at all throughout the note's duration.
decay represents how quickly the note will change from Attack volume to Sustain volume. If this value is 0, it will change immediately to Sustain volume the split-second after the note is played. If this value is 255, it won't ever get to Sustain volume, or at least takes a reeeeally long time. Anywhere in the middle, you'll have to test for yourself.
release represents how quickly the notes will become silent once they end. Think of it like the time it takes for a note on a piano to be completely silent after hitting it. If this value is 0, the note will immediately stop once it's run it's full course. If it's 255, the note will keep playing until it decays to Sustain volume, and if the Sustain volume isn't 0, it keeps going. Most instruments that have a high Release value tend to have a 0 Sustain and a less-than 255 Decay value.
Now, that's everything for the square voices. Now into the slight differences for the other ones.
None of the other voice types have a Sweep value.
voice_directsound replaces duty_cycle with sample_data_pointer. This is basically choosing the instrument sample that this voice uses, like a string ensemble or an organ.
Simalarly, voice_programmable_wave uses a wave_samples_pointer in place of the duty_cycle to choose a particular wave for the voice.
voice_noise uses a period value instead of duty_cycle. This can (I think) affect exactly how the static-y sound...sounds like. It's similar to duty_cycle in how it just affects the timbre of the voice.
Code:
voice_square_1 60, 0, 0, 2, 0, 0, 15, 0
or
voice_directsound 60, 0, DirectSoundWaveData_sc88pro_organ2, 255, 0, 255, 127
or
voice_programmable_wave_alt 60, 0, ProgrammableWaveData_86B4880, 0, 7, 15, 0asm/macros/music_voice.inc. But I'll save you some hassle by breaking them down right here. The differences between the square or directsound envelopes are pretty small, so I'll explain what each of the square_1 envelopes mean, then point out the differences in the other voice types. Copying roughly out of asm/macros/music_voice.inc, here are the meanings for each value of voice_square_1:
Code:
voice_square_1 base_midi_key, pan, sweep, duty_cycle, attack, decay, sustain, releasepan represents "where" the sound comes from. When playing music through stereo speakers, you can make the music come more out of the left speaker rather than the right, or vice versa. Although this value can be changed mid-song, setting this value in a voicegroup will affect how this voice is naturally "placed" in relation to the speakers. This value is almost always 0.
sweep represents.....something. I guess. In musical terms, a "sweep" is a smooth motion through the entire audible spectrum. Based on that, I don't know what this value means. It's almost always 0, so that doesn't clear much up.
duty_cycle represents the ratio of time spent at the maximum of a wave to the time spent at the minimum of the wave. That may sound a bit confusing, but what it breaks down to is that it affects the timbre of the wave itself. This is only used by the Square/Square2 voices, since directsound and noise don't use a particular wave, and Programmable waves use an exact wave, which cannot be changed. This value actually varies a little in the voicegroups in pokeemerald, from 0 to 2. Tweak this value to see if you can get the wave to sound a way you like. Maybe even go beyond 2 to see if you can get some weird sounds!
The website I mentioned earlier about 8-bit waves talks about the following envelopes at the bottom of the webpage, in case you want to see an example of all of them in play.
attack represents the amount of time it takes for a note to get from it's current volume to a new volume. If this value is 0, the second a note is played by this voice, it is immediately at the new volume. If it's not 0, then the lower the value (lowest being 1), the longer the note takes to get to full volume. 255 is the highest value for attack, where the note almost instantly goes to full volume, but just not quite.
sustain represents what volume the note decays to after reaching its Attack volume. This allows a note to either gradually decrease or increase in volume. If this value is 255 (the max), then the notes from this voice will be at full volume after the decay. As you decrease this value, the note will decay to a quieter and quieter volume. If it's 0, depending on how long a note is and the decay value, the note may become silent before it plays through its full length. If the attack and sustain values are equal, the volume will not change at all throughout the note's duration.
decay represents how quickly the note will change from Attack volume to Sustain volume. If this value is 0, it will change immediately to Sustain volume the split-second after the note is played. If this value is 255, it won't ever get to Sustain volume, or at least takes a reeeeally long time. Anywhere in the middle, you'll have to test for yourself.
release represents how quickly the notes will become silent once they end. Think of it like the time it takes for a note on a piano to be completely silent after hitting it. If this value is 0, the note will immediately stop once it's run it's full course. If it's 255, the note will keep playing until it decays to Sustain volume, and if the Sustain volume isn't 0, it keeps going. Most instruments that have a high Release value tend to have a 0 Sustain and a less-than 255 Decay value.
Now, that's everything for the square voices. Now into the slight differences for the other ones.
None of the other voice types have a Sweep value.
voice_directsound replaces duty_cycle with sample_data_pointer. This is basically choosing the instrument sample that this voice uses, like a string ensemble or an organ.
Simalarly, voice_programmable_wave uses a wave_samples_pointer in place of the duty_cycle to choose a particular wave for the voice.
voice_noise uses a period value instead of duty_cycle. This can (I think) affect exactly how the static-y sound...sounds like. It's similar to duty_cycle in how it just affects the timbre of the voice.
How to Add a Voicegroup
Spoiler:
This is actually a pretty simple process.
First, you'll want to pick out whatever instruments you want for your voicegroup. You can look through all of the original voicegroups to find instances of voices that you'd like to use and copy those down.
Once you get all those voices, create a text file and follow the pattern of one of the official voicegroups. It would look something like this:
Once you have it all setup, change the file's extension to .inc instead of .txt or whatever filetype it was (if you get a warning when doing this, ignore it), and name the file the same name as the voicegroup. Then, slap it into
For those that may be using the older version of pokeemerald where all of the voicegroups are in one file, just type in your voicegroup at the bottom of
First, you'll want to pick out whatever instruments you want for your voicegroup. You can look through all of the original voicegroups to find instances of voices that you'd like to use and copy those down.
Once you get all those voices, create a text file and follow the pattern of one of the official voicegroups. It would look something like this:
Code:
	.align 2
voicegroupname(You can name it whatever you want, as long as it's unique compared to the other voicegroups. It's generally advised to do something numeric like the other voicegroups, as it will allow you to reference the voicegroup in the [icode]songs.mk[/icode] file)
	voice_keysplit_all voicegroup001
	voice_keysplit voicegroup005, KeySplitTable1
	voice_square_1 0, 2, 0, 0, 15, 0
And so on and so forthsound/voicegroups. Finally, go into sound/voice_groups.inc and add an include statement at the bottom of the file with the name of your new voicegroup. If your version of pokeemerald doesn't have a sound/voicegroups folder, then just copy your voicegroup into the end of sound/voice_groups.inc. And your voicegroup is now ready to be used!For those that may be using the older version of pokeemerald where all of the voicegroups are in one file, just type in your voicegroup at the bottom of
sound/voice_groups.inc.How to Add a Voice
Spoiler:
Sometimes you may want a particular voice or sound that just isn't recreatable with what's within pokeemerald. Lucky for you, you can just slap in your own audio samples to create voices!
First, you need a sample of your instrument/voice/sound/etc. It's recommended that the note this sample plays is Cn3, as this is the common root note for samples. It can be other octaves of C if you wish, but making the root note anything but C tends to cause problems.
At this point, there is a split in the methods you can use to add your instrument. The first method I'll explain was originally theoretical, but DrakeSycamore was able to prove that it was possible and explained it to me. The second method will be the method that I used to use and is pretty straight-forward, albeit a bit inefficient in its use of memory. I highly recommend using Method 1, but Method 2 is available if need be.
Method 1: Loop-Points
Method 2: Manual Looping
Once you have your looped sample from either method, you're going to copy it into
Now open up
You don't even need to add the "DirectSoundWaveData" section to the name. It can just be "banjo" if you want. The important thing is that the .bin part uses the exact same name as your .aif file.
Assuming you followed all of these steps, your instrument will now be playable in the GBA as a directsound voice. All you have to do is add this instrument to a voicegroup, using the "DirectSoundWaveData_banjo" part as the name of the audio sample, like so:
First, you need a sample of your instrument/voice/sound/etc. It's recommended that the note this sample plays is Cn3, as this is the common root note for samples. It can be other octaves of C if you wish, but making the root note anything but C tends to cause problems.
At this point, there is a split in the methods you can use to add your instrument. The first method I'll explain was originally theoretical, but DrakeSycamore was able to prove that it was possible and explained it to me. The second method will be the method that I used to use and is pretty straight-forward, albeit a bit inefficient in its use of memory. I highly recommend using Method 1, but Method 2 is available if need be.
Method 1: Loop-Points
Spoiler:
With this method, you'll be adding loop points to your instrument sample. You'll need to download Awave Studio. The demo version is free, and that's all you need to add loop points. It has a trial period of 30 days, but you can just uninstall it and reinstall it to reset the timer. Once you've downloaded the software, you can open it up, and then open your instrument sample by clicking on File/Open Files. Once you select your file, it should appear in a table to the right. Double click on it. Click on the "Loop" tab. Click "Find Loop", and then "Finish". You can then listen to the loop that Awave Studio has created for you! If there seems to be a clicking sound or something that makes the loop sound bad, you can try clicking "X-Fade" and then "Finish", which will help it somewhat. If you already had particular loop points that you wanted to use, you can enter those points into the "Start:" and "End:" boxes. Once you're satisfied with your loop, click "Ok". Right-click on your file in the table, then click "Save selected....as". Enter a filename for your instrument, and set the save type to "AIF - Audio interchange (*.aif)". Set the Data Format to "PCM 8-bit", and the Channel Format to "Mono". With that, you officially have a looped instrument sample!
Method 2: Manual Looping
Spoiler:
You'll need to take your sample and manually loop it. What I mean by this is you need to edit your sample to be several seconds long by copying parts of it over and over, while making sure it doesn't sound like it's looping. I'd suggest making the sample last for at least 5 seconds. I personally make mine 10 just to be safe, but I doubt I'm ever going to be making a song that plays a single 10 second long note. This video does a decent job of explaining how to loop audio. You will need some form of audio editing software. Audacity is a free software that can get the job done.
Once you have your sample looped, save it off as a .aiff file. Make sure it uses mono channels, not stereo. If you end up getting an error when you try to compile your ROM with this sample, then just take your looped sample to Audacity, choose to "Export Audio", and make the save type "Other uncompressed files". Then, in Format Options, have the header be "AIFF (Apple/SGI)", and the encoding be "Signed 8-bit PCM". This method can be done with simpler software than the other method, but takes up more space on your ROM. This allows the GBA to play a note from your instrument up to however long you made your sample. If you had made it only 1 second long, every note from this instrument would need to be no longer than 1 second. If you tried to play a longer note, it would just get cut off after 1 second.
Once you have your sample looped, save it off as a .aiff file. Make sure it uses mono channels, not stereo. If you end up getting an error when you try to compile your ROM with this sample, then just take your looped sample to Audacity, choose to "Export Audio", and make the save type "Other uncompressed files". Then, in Format Options, have the header be "AIFF (Apple/SGI)", and the encoding be "Signed 8-bit PCM". This method can be done with simpler software than the other method, but takes up more space on your ROM. This allows the GBA to play a note from your instrument up to however long you made your sample. If you had made it only 1 second long, every note from this instrument would need to be no longer than 1 second. If you tried to play a longer note, it would just get cut off after 1 second.
Once you have your looped sample from either method, you're going to copy it into
sound/direct_sound_samples. Once there, make sure the file extension is .aif, not .aiff. If it's the latter, change it by renaming the file and deleting one of the f's from .aiff. (If you get a warning when doing this, ignore it.)Now open up
sound/direct_sound_data.inc. At the bottom of this file, add in your new voice's data, following the pattern of all of the other instruments. For example, if your .aif file was named "banjo.aif", you'd add something like this:
Code:
	.align 2
DirectSoundWaveData_banjo::
.incbin "sound/direct_sound_samples/banjo.bin"Assuming you followed all of these steps, your instrument will now be playable in the GBA as a directsound voice. All you have to do is add this instrument to a voicegroup, using the "DirectSoundWaveData_banjo" part as the name of the audio sample, like so:
Code:
voice_directsound 60, 0, DirectSoundWaveData_banjo, 255, 0, 255, 127.s Files
Spoiler:
This section is going to be pretty big, as there is a lot to discuss in relation to the .s files. As I mentioned in the first section of this tutorial, this is what the GBA actually looks at to play the music you hear in the game, not the .mid file.
I'll start at the top of the file, and then make my way down. I'll be looking at my arrangment of the Pokemon Black/White trainer theme's .s file. If you want to follow along, here's the link to it: https://drive.google.com/file/d/1rvvWwIKErflnnSYa8WDfKesvXGHWqIdp/view?usp=sharing
Top of the File
The Tracks & Commands
The End of the File
One random tidbit of knowledge that I didn't really know where else to fit: there isn't a note duration or wait command of every possible length. If you look through
This will allow you to play a note that lasts exactly 25 time units. Just something to remember in case you have some oddly timed notes to handle.
And that is the .s file, in all of its overly-detailed glory.
I'll start at the top of the file, and then make my way down. I'll be looking at my arrangment of the Pokemon Black/White trainer theme's .s file. If you want to follow along, here's the link to it: https://drive.google.com/file/d/1rvvWwIKErflnnSYa8WDfKesvXGHWqIdp/view?usp=sharing
Top of the File
Spoiler:
The first line will have this:
This means that all of the commands within
Next, you'll see something like this:
Every instance of "mus_rg_ajito" will be whatever the name of the .s file is. This file is named "mus_rg_ajito", so you'll be seeing a lot of that throughout this file.
The first line, "mus_rg_ajito_grp", tells the game which voicegroup to use for the song's voices. The voicegroup used in this song is my custom voicegroup, "voicegroupmidi". (Sometime after initially writing this, I've changed the name of my voicegroup to "voicegroup200", as it is better to have numeric names for voicegroups)
The second line, "mus_rg_ajito_pri", has something to do with the priority of the song. I'm not exactly sure what its purpose is.
The third line, "mus_rg_ajito_rev", sets the amount of reverb that is heard in the song. Shocking. You'll always have to set this value by typing "reverb_set+(the value you want the reverb to be)", or make it 0. I've experimented a bit with this value, and I've noticed something interesting: If you have a song playing that, for example, has a rev value of "reverb_set+50", it will have a slight reverb to it. However, if a sound-effect that has a rev value of 0 plays on top of that song, the song loses it's reverb quality, as if the rev value of the sound effect took precedence over the rev value of the song. I initially thought that maybe this has to do with that priority value that I mentioned earlier. Sound effects tend to have high priority values, so maybe the higher prioritized sounds set the reverb for whatever other sounds are being made. However, when I increased the priority of my song to be higher than the sound effects priority, the song's reverb would still disappear. This means there's some strange connection between reverb and sound effects that I don't understand yet.
The fourth line, "mus_rg_ajito_mvl", is the master volume. Changing this value will affect the volume of the entire song. It cannot go above 127, as the game uses unsigned 8-bit ints to hold these values, and 127 is the highest value that type of variable can hold.
The fifth line, "mus_rg_ajito_key", represents the key that the song is in. If you change this value, the entire song will be pitch shifted. It's handy for if you think the entire song is a little too low pitched.
The sixth line, "mus_rg_ajito_tbs", is used to affect the tempo of the song. I have only ever seen it as 1. If you set it to 2, the song would be twice as fast. 3, three times, and so on.
The seventh line, "mus_rg_ajito_exg", is a mystery to me. Sometimes it's 0, but most of the time it's 1. If anyone knows what this does, feel free to speak up.
The eighth line, "mus_rg_ajito_cmp", is yet another mystery. It always seems to be 1.
The ".section .rodata" line tells the game where to store the information of this song. Don't touch it.
The ".global" line holds the name of the file. I'm not sure why, but it does. And it does it well.
".align 2" is once again there for formatting purposes.
Code:
.include "MPlayDef.s"sound/MPlayDef.s can be used in this file. sound/MPlayDef.s is a good file to look at in case you forget what a certain command does, so keep that in mind.Next, you'll see something like this:
Code:
	.equ	mus_rg_ajito_grp, voicegroupmidi
	.equ	mus_rg_ajito_pri, 0
	.equ	mus_rg_ajito_rev, 0
	.equ	mus_rg_ajito_mvl, 70
	.equ	mus_rg_ajito_key, 0
	.equ	mus_rg_ajito_tbs, 1
	.equ	mus_rg_ajito_exg, 0
	.equ	mus_rg_ajito_cmp, 1

	.section .rodata
	.global	mus_rg_ajito
.align 2The first line, "mus_rg_ajito_grp", tells the game which voicegroup to use for the song's voices. The voicegroup used in this song is my custom voicegroup, "voicegroupmidi". (Sometime after initially writing this, I've changed the name of my voicegroup to "voicegroup200", as it is better to have numeric names for voicegroups)
The second line, "mus_rg_ajito_pri", has something to do with the priority of the song. I'm not exactly sure what its purpose is.
The third line, "mus_rg_ajito_rev", sets the amount of reverb that is heard in the song. Shocking. You'll always have to set this value by typing "reverb_set+(the value you want the reverb to be)", or make it 0. I've experimented a bit with this value, and I've noticed something interesting: If you have a song playing that, for example, has a rev value of "reverb_set+50", it will have a slight reverb to it. However, if a sound-effect that has a rev value of 0 plays on top of that song, the song loses it's reverb quality, as if the rev value of the sound effect took precedence over the rev value of the song. I initially thought that maybe this has to do with that priority value that I mentioned earlier. Sound effects tend to have high priority values, so maybe the higher prioritized sounds set the reverb for whatever other sounds are being made. However, when I increased the priority of my song to be higher than the sound effects priority, the song's reverb would still disappear. This means there's some strange connection between reverb and sound effects that I don't understand yet.
The fourth line, "mus_rg_ajito_mvl", is the master volume. Changing this value will affect the volume of the entire song. It cannot go above 127, as the game uses unsigned 8-bit ints to hold these values, and 127 is the highest value that type of variable can hold.
The fifth line, "mus_rg_ajito_key", represents the key that the song is in. If you change this value, the entire song will be pitch shifted. It's handy for if you think the entire song is a little too low pitched.
The sixth line, "mus_rg_ajito_tbs", is used to affect the tempo of the song. I have only ever seen it as 1. If you set it to 2, the song would be twice as fast. 3, three times, and so on.
The seventh line, "mus_rg_ajito_exg", is a mystery to me. Sometimes it's 0, but most of the time it's 1. If anyone knows what this does, feel free to speak up.
The eighth line, "mus_rg_ajito_cmp", is yet another mystery. It always seems to be 1.
The ".section .rodata" line tells the game where to store the information of this song. Don't touch it.
The ".global" line holds the name of the file. I'm not sure why, but it does. And it does it well.
".align 2" is once again there for formatting purposes.
The Tracks & Commands
Spoiler:
Now we get into the real nitty-gritty of the .s file. We'll look at how tracks are designed, as well as the many commands that are used within these tracks.
Each track is seperated with a line, as well as a denotation of which track it is. It'll look something like this:
This line is only here for us humans that look at these files. This line is completely ignored by the GBA due to it being commented out. Any line that has a "@" at the far left is commented out.
Then we see an important label:
This tells the GBA that this is the first track of this song, and everything below it is part of this track. At the top of each track, you'll see a line similar to this, with the number relating to the track in question.
As we go through this track, you'll see dashed lines with numbers to the left of them like this:
Again, due to them being commented out, these are meant for us humans. Each of these sections can be considered as one measure of the song. Of course, since this is used for a program, the first measure is 000 rather than 001, since us programers love starting with 0. We then see several commands, which I will explain. You can see all of these commands in
Just a side-note that I feel like I need to point out: every single command in a .s file starts with ".byte". Always. Without exception.
The first command we see is:
KEYSH is the key-shift command. It will shift the key of the track it's in. Whatever value you add or subtract the key with will shift the track's pitch by that many half-steps. As you may notice, it uses the key of the entire song, "mus_rg_ajito_key", and then adds a value to it. In this case, the command does nothing, since it shifts the key by 0. Sometimes when a .mid file is turned into a .s file, some commands are made that serve no purpose. Just a minor glitch with mid2agb, I guess. Or maybe mid2agb is designed to put one of these commands at the top of each track, just in case the user wants to change the key? Who knows. The next command is this:
TEMPO is the tempo-changing command. This sets the tempo for the entire song, not just the one track that it's in. This is one of the few (if not only) commands that affects every track. This command takes a number, which is the BPM that you want the song to be, multiplies it by the song's tbs value, and then divides it by 2. Why does it need to be divided by 2, you ask? I don't know, but it does. This is always the format for TEMPO commands.
Next line:
VOICE is the voice-changing command. This sets which voice from the voicegroup of the song is being used in this track. The number is the location of the voice within the voicegroup. This particular command sets Track 1 to use the 39th instrument in the voicegroup. Not the 38th. Remember, this is a program, so the first voice in the voicegroup would be 0, the second voice would be 1, and so on. If a track is never given a VOICE command, it cannot make any sound whatsoever. This can actually be a handy trick if you want to mute a track: just comment out all of the VOICE commands in the track, and the track will be completely muted.
Next line:
VOL is the volume-changing command. The volume can go up to 127 and no higher, and the number must be multiplied by the song's mvl value and then divided by mxv, which is a constant for the loudest possible volume on the GBA. Kind of a weird format, but that's how it's done.
Next line:
PAN is the....pan...command. Pan is where the sound is being placed in stereo space. Whether it's coming more from the right speaker or the left speaker. You always need to add/subtract from c_v. Adding moves the sound to the right, subtracting to the left.
Next line:
MOD is the...mod...command. There are three types of mods: vibrate (mod_vib), tremolo (mod_tre), and auto-panpot (mod_pan). Before you would use MOD, you would use the command MODT and set the type to be whichever one of these that you want, using the names in the parenthesis. However, when I tested using anything except mod_vib, I didn't notice any change to the music. Perhaps I was using too low a value for MOD (I tried entering 15, which is higher than I've ever seen it used), but it is something to note. MODT is set to mod_vib by default.
Next line:
Ah, here is our first actual note! Whenever a note is played, it follows this format: note-length, pitch, velocity. This note will last for 17...time units, and it will play E1 at a velocity of 112 (max is 127). Time units is just the term I have for the numbers used with N##. If a song is in 4/4, a single measure has 96 time units, which would mean one beat lasts for 24 time units. If the song is in 3/4, a single measure will instead have 72 time units, still leaving a single beat with 24 time units. En1 means E-natural-1. Each number represents an octave. The higher the number, the higher pitched the octave. You can look through
Next line:
Pretty short, but pretty important. This is a wait command. This forces the track to wait 24 time units before going to the next command. An important thing to point out here: even though the prior command had a note that lasted for 17 time units, that doesn't mean 17 time units pass before this wait command starts. The note starts to play, and then we immediately start the wait command. Every command will immediately play one after the other if no wait commands are between them. As such, each measure should have a number of wait commands that add up to 96 (or 72 if the song is in 3/4), so as to have the measure last it's full length.
Next line:
Mmmm, now here's where things get interesting. This looks like a note command, and yet we don't see the duration of the note! Strange, isn't it? This is actually an opitimization that the GBA's programming uses. Since we aren't given a note duration here, the GBA will just use the prior note duration, which would be N17. If we hadn't given a velocity value, it would have also used the prior one, which was 112. The GBA can look back like this to fill empty spots for every type of command. Say we set the volume to 110 like this:
But then we want to immediately change the volume to 100. We can just type this:
The GBA will remember that the prior command was a VOL command, so it knows what to do with this data. An important thing to point out: if we had typed a different command between these two volume changes, like a note command, we would have still needed to type VOL into that second command. If we had typed this:
The GBA would get real confused. It would try to play a note using "100*mus_rg_ajito_mvl/mxv" since the prior command was a note command, but it can't do anything with that data. The only command that won't cause this confusion is a wait command. The GBA will look further back to the prior non-wait command to get it's missing data. Back to note commands, if we want to repeat a note, we could write something like this:
Or this:
These two would both play the exact same thing. Since all of the data was given in an earlier command, we just need to give a single element of the prior note to let the GBA know that we want to play another note. I'm not sure if you can do this by just giving the velocity, though. We can also get a bit more creative in writing our notes by typing something like this:
This bit of code would first play an E-natural-1 for 17 time units at 112 velocity. Once 20 time units passed, it would then play another E-natural-1 at 112 velocity, but this time for 20 time units. After waiting another 20 time units, another note would be played for 20 time units at 112 velocity, but this time it's a C-natural-2. As you can see, we can leave out certain commands and change others to simplify the data for each line without losing any information. mid2agb does this automatically, so it's important to be aware of how these lines can be written.
Not a whole lot of other commands are used until later on in the song that I'm using as an example, so I'll just list off the remaining commands from
FINE defines the end of a track. Example:
BEND will bend the pitch of a track. You would use c_v, similarly to the PAN command. Example:
BENDR will affect how much the BEND value bends the pitch. From what I can tell, it looks like it is set to 2 by default in
TIE can replace a note duration. This will make a note last until an EOT command is given. Example:
EOT will end a TIE note. Example:
XCMD basically just announces that an extended command is about to be used. These extended commands take an additional argument that states what type of extended command is being used, which you will see in the examples for the next couple of commands. These commands are based on C code that can be found in
xIECV sets the volume for an echo effect. It is at 0 by default, meaning there's no echo. Example:
xIECL sets the length of the echo, or how long the echo lasts. It is at 0 by default, also meaning there's no echo. Example:
There are several other extended commands that do not have a declared constant in
These commands set the attack envelope of the track to be 250, the decay envelope to 150, the sustain envelope to 50, and the release envelope to 220, respectively. These commands do not work on voices that use voice_keysplit or voice_keysplit_all, since that voice technically contains multiple sets of voice envelopes. There are a few other extended commands that don't have constants, but I don't fully understand how they work yet, so I won't bother giving you an uneducated explanation. You can see a full table of all of the extended commands at the bottom of
If you want, you can also go into
There are some commands that need to be seen in action to be understood. Looking back at the song I was using as an example before, you'll see at Track 1 measure 14 (or 014) that there's this line right at the top:
This is a label. Labels are used for a few commands:
PEND can be used to make a measure with a label become a pattern. You place this command where you want your pattern to end, hence the name PEND. This technically doesn't only apply to a single measure. You could have an entire track be a measure, as long as there are no labels between the label of the first measure and the PEND command. This is incredibly uncommon and usually risky, so it's generally best to just have a pattern last for one measure. Looking at the bottom of measure 14, you will see this command:
PATT will play a pattern, and then proceed through the song. This can be seen in Track 1 measure 15:
".word" is used with some commands almost like an argument for a method. With PATT, .word holds the pattern label that indicates which pattern shall be played.
GOTO will cause the track to jump to a label. It'll look something like this:
This is different from PATT in two ways:
1. GOTO doesn't need a pattern to be marked with PEND, whereas PATT does.
2. GOTO causes the track to play from the given label, whereas PATT will play the pattern, and then move on to the next measure. For example, this:
Will cause measure 15 to be identical to measure 14, and then the track will move on to measure 16. This, on the other-hand:
Would cause the track to move back to measure 14, play measure 14, and then move forward to measure 15, where we would again go back to measure 14, and find ourselves in an infinite loop. GOTO is generally used only to loop the music.
There are other commands within
Each track is seperated with a line, as well as a denotation of which track it is. It'll look something like this:
Code:
@**************** Track 1 (Midi-Chn.1) ****************@Then we see an important label:
Code:
mus_rg_ajito_1:As we go through this track, you'll see dashed lines with numbers to the left of them like this:
Code:
@ 000 ----------------------------------------sound/MPlayDef.s if you so desire.Just a side-note that I feel like I need to point out: every single command in a .s file starts with ".byte". Always. Without exception.
The first command we see is:
Code:
.byte KEYSH , mus_rg_ajito_key+0
Code:
.byte TEMPO , 176*mus_rg_ajito_tbs/2Next line:
Code:
.byte VOICE , 38Next line:
Code:
.byte VOL , 106*mus_rg_ajito_mvl/mxvNext line:
Code:
.byte PAN , c_v+0Next line:
Code:
.byte MOD , 0Next line:
Code:
.byte N17 , En1 , v112sound/MPlayDef.s to see all of the possible notes you can use. And for those that don't know, velocity is another term for volume that is often used in music, especially with midis. That velocity value will affect specifically this one note. The volume set by a VOL command is still in effect here, but this velocity element gives us a bit more precision when it comes to volume control.Next line:
Code:
.byte W24Next line:
Code:
.byte En1 , v108
Code:
.byte VOL , 110*mus_rg_ajito_mvl/mxv
Code:
.byte 100*mus_rg_ajito_mvl/mxv
Code:
.byte		VOL   , 110*mus_rg_ajito_mvl/mxv
.byte		N17   , En1 , v112
.byte		        100*mus_rg_ajito_mvl/mxv
Code:
.byte		N17   , En1 , v112
.byte      W20
.byte		N17
.byte      W20
.byte		N17
Code:
.byte		N17   , En1 , v112
.byte      W20
.byte		        En1
.byte      W20
.byte		        En1
Code:
.byte		N17   , En1 , v112
.byte	W20
.byte		N20
.byte	W20
.byte Cn2Not a whole lot of other commands are used until later on in the song that I'm using as an example, so I'll just list off the remaining commands from
sound/MPlayDef.sFINE defines the end of a track. Example:
Code:
@ 080   ----------------------------------------
	.byte	FINE

@**************** Track 2 (Midi-Chn.2) ****************@
BEND will bend the pitch of a track. You would use c_v, similarly to the PAN command. Example:
Code:
.byte BEND , c_v-6BENDR will affect how much the BEND value bends the pitch. From what I can tell, it looks like it is set to 2 by default in
src/m4a.c within the m4aMPlayImmInit function. This BENDR value is multiplied by the BEND value to determine the amount of bend applied to the note. Example:
Code:
.byte BENDR , 5TIE can replace a note duration. This will make a note last until an EOT command is given. Example:
Code:
.byte TIE , Gs1 , v127EOT will end a TIE note. Example:
Code:
	.byte		TIE   , Gs1 , v127
	.byte	W32
	.byte	W01
	.byte		EOT
XCMD basically just announces that an extended command is about to be used. These extended commands take an additional argument that states what type of extended command is being used, which you will see in the examples for the next couple of commands. These commands are based on C code that can be found in
src/m4a.c. It is possible to add your own commands via these extended commands, which I have demonstrated in this tutorial of mine that lets you make dynamic music.xIECV sets the volume for an echo effect. It is at 0 by default, meaning there's no echo. Example:
Code:
.byte XCMD , xIECV , 40xIECL sets the length of the echo, or how long the echo lasts. It is at 0 by default, also meaning there's no echo. Example:
Code:
.byte XCMD , xIECL , 80sound/MPlayDef.s, but can still be used in your songs. For example:
Code:
.byte	XCMD , 4 , 250
.byte	XCMD , 5 , 150
.byte	XCMD , 6 , 50
.byte XCMD , 7 , 220src/m4a_tables.c, and you can see what each command does in src/m4a.c. To use any of these commands, you just need to write:
Code:
.byte XCMD , INDEX_OF_COMMAND_IN_TABLE , PARAMETERSsound/MPlayDef.s and add your own constants for these commands. For example, I've added "xDECAY" and "xSUSTAIN" as constants in that file, making them equivalent to 5 and 6, respectively.There are some commands that need to be seen in action to be understood. Looking back at the song I was using as an example before, you'll see at Track 1 measure 14 (or 014) that there's this line right at the top:
Code:
mus_rg_ajito_1_014:PEND can be used to make a measure with a label become a pattern. You place this command where you want your pattern to end, hence the name PEND. This technically doesn't only apply to a single measure. You could have an entire track be a measure, as long as there are no labels between the label of the first measure and the PEND command. This is incredibly uncommon and usually risky, so it's generally best to just have a pattern last for one measure. Looking at the bottom of measure 14, you will see this command:
Code:
@ 014   ----------------------------------------
mus_rg_ajito_1_014:
	.byte		N11   , Fn1 , v124
	.byte	W12
	.byte		        Fn2 , v116
	.byte	W12
	.byte		        Fn1 , v120
	.byte	W12
	.byte		        Fn2 , v116
	.byte	W12
	.byte		        Fn1 , v124
	.byte	W12
	.byte		        Fn2 , v116
	.byte	W12
	.byte		        Fn1 , v120
	.byte	W12
	.byte		        Fn2 , v116
	.byte	W12
	.byte	PEND
Code:
.byte	PATT
.word mus_rg_ajito_1_014GOTO will cause the track to jump to a label. It'll look something like this:
Code:
.byte	GOTO
.word mus_rg_ajito_1_0141. GOTO doesn't need a pattern to be marked with PEND, whereas PATT does.
2. GOTO causes the track to play from the given label, whereas PATT will play the pattern, and then move on to the next measure. For example, this:
Code:
@ 015   ----------------------------------------
	.byte	PATT
	 .word	mus_rg_ajito_1_014
Code:
@ 015   ----------------------------------------
	.byte	GOTO
.word mus_rg_ajito_1_014There are other commands within
sound/MPlayDef.s, but those that I haven't already explained rarely (if ever) show up, so I don't know much about them. I'm loosely aware of what they may do, like LFOS and LFODL having something to do with how the effects of MOD sound, but it's just surface knowledge.The End of the File
Spoiler:
At the very end of the .s file, you'll see something like this:
This needs to be at the end of every .s file, as it kind of wraps up all of the data. You will almost never need to mess with this stuff, but it's important to know it's there.
The first .byte is important, because it denotes how many tracks are in this song.
I don't know what the "NumBlks" .byte means. It always seems to be 0.
The next two .bytes refer to priority and reverb. These just take the values we put at the top of the file and bring them down here, since this is where a lot of critical data is read from.
".word mus_rg_ajito_grp" is basically reminding the file of which voicegroup is being used. This was defined at the top of the file.
The last several .word's represent each track's name. mid2agb names the tracks based off of the song's name, and then places them in numerical order. If some or all of these aren't here, or if there are unnecessary track names added, errors occur. The only reason you should care about this is if you decide to delete a track, in which case you need to lower the number of tracks as well as delete one of the tracks from the list.
And, of course, ".end" marks the end of the file.
Code:
@******************************************************@
	.align	2

mus_rg_ajito:
	.byte	10	@ NumTrks
	.byte	0	@ NumBlks
	.byte	mus_rg_ajito_pri	@ Priority
	.byte	mus_rg_ajito_rev	@ Reverb.

	.word	mus_rg_ajito_grp

	.word	mus_rg_ajito_1
	.word	mus_rg_ajito_2
	.word	mus_rg_ajito_3
	.word	mus_rg_ajito_4
	.word	mus_rg_ajito_5
	.word	mus_rg_ajito_6
	.word	mus_rg_ajito_7
	.word	mus_rg_ajito_8
	.word	mus_rg_ajito_9
	.word	mus_rg_ajito_10

.endThe first .byte is important, because it denotes how many tracks are in this song.
I don't know what the "NumBlks" .byte means. It always seems to be 0.
The next two .bytes refer to priority and reverb. These just take the values we put at the top of the file and bring them down here, since this is where a lot of critical data is read from.
".word mus_rg_ajito_grp" is basically reminding the file of which voicegroup is being used. This was defined at the top of the file.
The last several .word's represent each track's name. mid2agb names the tracks based off of the song's name, and then places them in numerical order. If some or all of these aren't here, or if there are unnecessary track names added, errors occur. The only reason you should care about this is if you decide to delete a track, in which case you need to lower the number of tracks as well as delete one of the tracks from the list.
And, of course, ".end" marks the end of the file.
One random tidbit of knowledge that I didn't really know where else to fit: there isn't a note duration or wait command of every possible length. If you look through
sound/MPlayDef.s, you'll see that once the note duration and wait commands get past 24 time units, they start skipping up. This means that, if you want a note to last 25 time units, you'll need to write this:
Code:
.byte	TIE , En1
.byte	W24
.byte	W01
.byte EOTAnd that is the .s file, in all of its overly-detailed glory.
How to Work with .mid Files
Spoiler:
While I definitely prefer working directly with .s files, the sad reality is that it is still necessary to rely on .mid files to create the .s file, and if you didn't change
(This is more of a random collection of tips, tricks, and discoveries that I've found to be useful while working with midis for pokeemerald and less of a proper tutorial for using a midi editor. If you don't know how to use a midi editor yet, this won't be helpful.)
I will be using MidiEditor throughout this section as my midi editor, so some things that I point out may not be applicable or may be handled differently within a different midi editor like Anvil Studio or what-have-you.
Working with TEMPO, BEND, and other Non-Note Commands
A Few Random Just-So-You-Knows
Tracks & Channels Don't Play Nice
The Power of a Master Voicegroup and Dealing with Percussion
Looping Songs
Using Standard XCMD Commands
Using Voice Envelope XCMD Commands (A Look at the .mid → .s process)
Adding Your Own Commands to mid2agb (A Slightly Deeper Look at the .mid → .s Process)
That's about all I've got regarding working with .mid files in pokeemerald. It's not exactly my cup of tea, since it requires several extra steps to do stuff that I could just do directly in the .s file, but there are perks to working in a midi editor sometimes, so I can't disregard the .mid entirely.
Makefile so that the .s files aren't deleted when you run make clean, if you were ever to run that command, all of your pain-stakingly crafted .s files would vanish into the bits. Also, I am aware that some people do not want to work with .s files. Due to these facts, here is what I have learned about working with .mid files in relation to adding and editing songs in pokeemerald.(This is more of a random collection of tips, tricks, and discoveries that I've found to be useful while working with midis for pokeemerald and less of a proper tutorial for using a midi editor. If you don't know how to use a midi editor yet, this won't be helpful.)
I will be using MidiEditor throughout this section as my midi editor, so some things that I point out may not be applicable or may be handled differently within a different midi editor like Anvil Studio or what-have-you.
Working with TEMPO, BEND, and other Non-Note Commands
Spoiler:
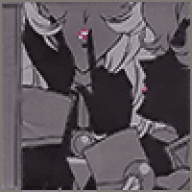
Creating a note should be pretty straight-forward if you know how to use a midi editor: place the note, set the duration and volume/velocity, and you're good to go. What some less-experienced midi editing fellows might not know (including myself when I first got into it) is how to get certain commands to show up in the .s file. A lot of this will occur in some sort of area like this:
![[PokeCommunity.com] How To Add, Edit, And Understand Music in Pokeemerald](https://data.pokecommunity.com/attachments/20/20373-7581acfcf6c3ccce290b016cfb8eeac2.jpg "[PokeCommunity.com] How To Add, Edit, And Understand Music in Pokeemerald")
This is at the bottom of the piano-roll (the visual display of all of the notes), and holds a great many details, including tempo, what instrument each channel uses, and many more little tricks. There are some more obvious ones like "Pitch Bend" relating to BEND and "Tempo Change" relating to TEMPO, and some less obvious ones, like "Program Change" relating to VOICE. There are also multiple commands that fall under "Control Change", including but not limited to MOD, VOL, and PAN, which you pick out from this dropdown:
![[PokeCommunity.com] How To Add, Edit, And Understand Music in Pokeemerald](https://data.pokecommunity.com/attachments/20/20374-546474ae5c92910e03e702858f4edeb4.jpg "[PokeCommunity.com] How To Add, Edit, And Understand Music in Pokeemerald")
If you choose a Control Change event that isn't accounted for in the .mid → .s conversion program, it will just generate a wait command in the .s file. To see all of the different Control Change event types that are accounted for in mid2agb, go to
The value for each case correlates to the index of the command itself. For example, the Control Change event at index 7 in MidiEditor is the volume change command. As we can see in this switch statement, 0x07 relates to the VOL command. A pretty sensible association. Some of these commands do not have sensible associations with their respective Control Change types. Some may be tied to completely undefined Control Change types. You just have to look at this function to know what relates to what. A full explanation of this function comes later in the Using Voice Envelope XCMD Commands (A Look at the .mid → .s process) section.
Spoiler:
This is at the bottom of the piano-roll (the visual display of all of the notes), and holds a great many details, including tempo, what instrument each channel uses, and many more little tricks. There are some more obvious ones like "Pitch Bend" relating to BEND and "Tempo Change" relating to TEMPO, and some less obvious ones, like "Program Change" relating to VOICE. There are also multiple commands that fall under "Control Change", including but not limited to MOD, VOL, and PAN, which you pick out from this dropdown:
Spoiler:
If you choose a Control Change event that isn't accounted for in the .mid → .s conversion program, it will just generate a wait command in the .s file. To see all of the different Control Change event types that are accounted for in mid2agb, go to
tools/mid2agb/agb.cpp and look for a function called PrintControllerOp. It looks like this:
Code:
void PrintControllerOp(const Event& event)
{
    switch (event.param1)
    {
    case 0x01:
        PrintOp(event.time, "MOD   ", "%u", event.param2);
        break;
    case 0x07:
        PrintOp(event.time, "VOL   ", "%u*%s_mvl/mxv", event.param2, g_asmLabel.c_str());
        break;
    case 0x0A:
        PrintOp(event.time, "PAN   ", "c_v%+d", event.param2 - 64);
        break;
    case 0x0C:
    case 0x10:
        PrintMemAcc(event);
        break;
    case 0x0D:
        s_memaccOp = event.param2;
        PrintWait(event.time);
        break;
    case 0x0E:
        s_memaccParam1 = event.param2;
        PrintWait(event.time);
        break;
    case 0x0F:
        s_memaccParam2 = event.param2;
        PrintWait(event.time);
        break;
    case 0x11:
        std::fprintf(g_outputFile, "%s_%u_L%u:\n", g_asmLabel.c_str(), g_agbTrack, event.param2);
        PrintWait(event.time);
        ResetTrackVars();
        break;
    case 0x14:
        PrintOp(event.time, "BENDR ", "%u", event.param2);
        break;
    case 0x15:
        PrintOp(event.time, "LFOS  ", "%u", event.param2);
        break;
    case 0x16:
        PrintOp(event.time, "MODT  ", "%u", event.param2);
        break;
    case 0x18:
        PrintOp(event.time, "TUNE  ", "c_v%+d", event.param2 - 64);
        break;
    case 0x1A:
        PrintOp(event.time, "LFODL ", "%u", event.param2);
        break;
    case 0x1D:
    case 0x1F:
        PrintExtendedOp(event);
        break;
    case 0x1E:
        s_extendedCommand = event.param2;
        // TODO: loop op
        break;
    case 0x21:
    case 0x27:
        PrintByte("PRIO  , %u", event.param2);
        PrintWait(event.time);
        break;
    default:
        PrintWait(event.time);
        break;
    }
}A Few Random Just-So-You-Knows
Spoiler:
- The absolute center value for things like PAN and BEND is 64 in pokeemerald, which is represented as
- The lowest note displayed in MidiEditor is Cn-1, but that note correlates to Cn-2, or CnM2 in pokeemerald. This means all notes in MidiEditor are one octave above their respective note in pokeemerald. I don't know if this discrepancy also exists in other midi editors. Just so you know.
- How the song sounds in the midi editor is often substantially different from how it sounds in-game, even if you use the pokeemerald samples in your midi editor. If you can manage it, being able to get the pokeemerald samples into your midi editor can help give you a better idea of what the song will sound like in-game. Again, even if you do this, it will not sound exactly the same, due to how the GBA handles sound. You will still need to make your changes, then put it into the game, give it a listen, then make more changes until it's done. Just so you know.
c_v, or "center value". In MidiEditor, this center value is 8192. Assuming your midi editor uses similar values, you can just divide the huge number by 128 and round down to know what value you'll get in the .s file. For bending a note, if you raise or lower the pitch by 4096 (or 32 in the .s file), that is a half-step change in pitch. The most you can bend up or down is 1 whole-step, although you can only go up by 8064 (or 63 in pokeemerald) to a max of 16256 (or 127 in pokeemerald) due to the max value of most commands in the .s file being 127. This means you'll be ever-so flat when trying to bend up a whole-step. You can still bend down a full whole step, going down to 0 in both the midi editor and pokeemerald. This is all assuming BENDR is still at its default value of 2. If you increase that value to 3, for example, bending the pitch by around 2730 will be a half-step, and around 5461 will be a whole step. Just so you know.- The lowest note displayed in MidiEditor is Cn-1, but that note correlates to Cn-2, or CnM2 in pokeemerald. This means all notes in MidiEditor are one octave above their respective note in pokeemerald. I don't know if this discrepancy also exists in other midi editors. Just so you know.
- How the song sounds in the midi editor is often substantially different from how it sounds in-game, even if you use the pokeemerald samples in your midi editor. If you can manage it, being able to get the pokeemerald samples into your midi editor can help give you a better idea of what the song will sound like in-game. Again, even if you do this, it will not sound exactly the same, due to how the GBA handles sound. You will still need to make your changes, then put it into the game, give it a listen, then make more changes until it's done. Just so you know.
Tracks & Channels Don't Play Nice
Spoiler:
In most midi editors, there are these two things called tracks and channels. Tracks, generally speaking, relate to a particular element of the song, be it the melody, an instrument, or whatever. It's more conceptual than a channel. A channel relates to a particular instrument/voice in the song. The instrument/voice for a given channel can change in the middle of a song via a Program Change, which is a VOICE command in the .s file. Note that a Program Change is not changing the voice of the track in the midi, but the voice of the channel, whereas the generated VOICE command IS changing the voice of the track in the .s file, since there are no channels in the .s file.
Despite how it looks in MidiEditor, the tracks and channels are not actually color-coordinated. You can have one channel appear in multiple tracks, and one track can have multiple channels in it. It is generally advised to minimize the number of channels per track, as it can be confusing to read sometimes. This can become even more apparent when looking at the converted .s file of a midi that has tracks with multiple channels. Sometimes each channel within a single track gets turned into a seperate track within the .s file. If you aren't careful, you could potentially run out of tracks due to frivolous channel-track combinations. If you really need to have a single track use multiple instrument throughout the course of the song (a situation I have run into a few times) and you can't add another track to handle a handful of notes, it's better to just do a Program Change and change the voice of the channel that is being used by the given track to whatever voice you need, rather than incorporating another channel with your desired voice into the track.
TL;DR, try to only have one channel per track.
The Power of a Master Voicegroup and Dealing with Percussion
Spoiler:
Having a single, master voicegroup is really handy, since it allows you to avoid needing to make a new voicegroup for each song. It's even handier if you take the time to line up each instrument in your voicegroup with each instrument in your midi editors' voice collection. Looking at MidiEditors selection of sounds, we see that Acoustic Grand Piano is at the top, followed by Bright Acoustic Piano and Electric Grand Piano:
![[PokeCommunity.com] How To Add, Edit, And Understand Music in Pokeemerald](https://data.pokecommunity.com/attachments/20/20375-98591be24a56e368db2076bf9df1d6d4.jpg "[PokeCommunity.com] How To Add, Edit, And Understand Music in Pokeemerald")
Looking at my master voicegroup, you will see that it starts with the piano keysplit voice, followed by a different piano sample:
![[PokeCommunity.com] How To Add, Edit, And Understand Music in Pokeemerald](https://data.pokecommunity.com/attachments/20/20376-834951a4408b40cd6bba9fa449e3dfdb.jpg "[PokeCommunity.com] How To Add, Edit, And Understand Music in Pokeemerald")
At the time of writing this, I don't have an electric grand piano nor a honky-tonk sample setup, so those just have a filler voice. By doing this, if I set a channel to a particular instrument in MidiEditor, I know what sample it will translate to in the .s file.
The percussion can be a bit of a challenge to deal with, though. In MidiEditor, there is no percussion voice, persay. There are melodic-ish percussion instruments, like a taiko drum, timpani, gunshots, you get it. There is no drumkit or anything like that. Instead, for whatever reason, Channel 9 is explicitely set to percussion. Regardless what instrument you set Channel 9 to, it will only be percussion voices, with each note being a different percussion instrument, just like the keysplit percussion voice in pokeemerald. Unfortunately, the different percussion instruments in this percussion voice are not laid out in the same order in MidiEditor as they are in the pokeemerald percussion voice. Some happen to be placed on the same notes in both MidiEditor and pokeemerald, some don't.
Focusing back on the placement of the percussion voice, what I have done is placed the keysplit percussion voice at index 96, or the 97th voice in my voicegroup. That was just a spot that was easy for me to remember. When doing this, I must now be aware that the 97th voice in MidiEditor is not FX 1, and is instead my percussion voice. This means the 98th voice, which is FX 2 in MidiEditor, is FX 1 in pokeemerald, and FX 3 in MidiEditor is FX 2 in pokeemerald, and so on. If I were smarter, I would put my percussion voicegroup in the same spot as a voice that I doubt I will ever use, like telephone ring or gunshot. However, I'm settled in my ways, and there has not been a great enough force to shove me out of this rut. Maybe I'll change it....but then that means I have to change my old songs to look to a different value....I dunno.
Another important detail to consider is that I have effectively removed the last voice in MidiEditor's sound selection, being the gunshot voice. Not a grand loss, but it is something to remember: for each added voice that is not normally in your midi editor's sound selection, you lose access to one of the standard voices in your midi editor, assuming it has the standard 128 voice count. The reason behind this loss is:
1. The VOICE command can only go from 0-127, so any additions would cause the last voice to be at index 128, outside of VOICE's range.
2. Midi editors can't just add a new voice to their collection, or at least MidiEditor can't. So if you add a new voice to the pokeemerald voicegroup, you can't cause it to appear as an option in your midi editor.
A bit of a pain, but the easiest way to go about adding a percussion voice to your master voicegroup would be to replace the last voice in your midi editor's sound selection.
There are some songs where you know you will need several very unique voices for your song. In those cases, it ends up being easier to just create a separate voicegroup for those songs. If you have a ton of songs that use these very unique voices, with each song needing access to different normal instruments in addition to your unique ones, it may be wise to just make another master voicegroup, swapping in those unique voices of yours and keeping whichever normal voices you need. It all depends on whether you think that effort will be worth it for whatever it is you are doing.
Spoiler:
Looking at my master voicegroup, you will see that it starts with the piano keysplit voice, followed by a different piano sample:
Spoiler:
At the time of writing this, I don't have an electric grand piano nor a honky-tonk sample setup, so those just have a filler voice. By doing this, if I set a channel to a particular instrument in MidiEditor, I know what sample it will translate to in the .s file.
The percussion can be a bit of a challenge to deal with, though. In MidiEditor, there is no percussion voice, persay. There are melodic-ish percussion instruments, like a taiko drum, timpani, gunshots, you get it. There is no drumkit or anything like that. Instead, for whatever reason, Channel 9 is explicitely set to percussion. Regardless what instrument you set Channel 9 to, it will only be percussion voices, with each note being a different percussion instrument, just like the keysplit percussion voice in pokeemerald. Unfortunately, the different percussion instruments in this percussion voice are not laid out in the same order in MidiEditor as they are in the pokeemerald percussion voice. Some happen to be placed on the same notes in both MidiEditor and pokeemerald, some don't.
Focusing back on the placement of the percussion voice, what I have done is placed the keysplit percussion voice at index 96, or the 97th voice in my voicegroup. That was just a spot that was easy for me to remember. When doing this, I must now be aware that the 97th voice in MidiEditor is not FX 1, and is instead my percussion voice. This means the 98th voice, which is FX 2 in MidiEditor, is FX 1 in pokeemerald, and FX 3 in MidiEditor is FX 2 in pokeemerald, and so on. If I were smarter, I would put my percussion voicegroup in the same spot as a voice that I doubt I will ever use, like telephone ring or gunshot. However, I'm settled in my ways, and there has not been a great enough force to shove me out of this rut. Maybe I'll change it....but then that means I have to change my old songs to look to a different value....I dunno.
Another important detail to consider is that I have effectively removed the last voice in MidiEditor's sound selection, being the gunshot voice. Not a grand loss, but it is something to remember: for each added voice that is not normally in your midi editor's sound selection, you lose access to one of the standard voices in your midi editor, assuming it has the standard 128 voice count. The reason behind this loss is:
1. The VOICE command can only go from 0-127, so any additions would cause the last voice to be at index 128, outside of VOICE's range.
2. Midi editors can't just add a new voice to their collection, or at least MidiEditor can't. So if you add a new voice to the pokeemerald voicegroup, you can't cause it to appear as an option in your midi editor.
A bit of a pain, but the easiest way to go about adding a percussion voice to your master voicegroup would be to replace the last voice in your midi editor's sound selection.
There are some songs where you know you will need several very unique voices for your song. In those cases, it ends up being easier to just create a separate voicegroup for those songs. If you have a ton of songs that use these very unique voices, with each song needing access to different normal instruments in addition to your unique ones, it may be wise to just make another master voicegroup, swapping in those unique voices of yours and keeping whichever normal voices you need. It all depends on whether you think that effort will be worth it for whatever it is you are doing.
Looping Songs
Spoiler:
Creating a loop is fairly simple. At the point in your midi where the loop begins, add a text event with "[" in it. Looking at the Route 101 theme, we see this "[" show up at the beginning of measure 2:
![[PokeCommunity.com] How To Add, Edit, And Understand Music in Pokeemerald](https://data.pokecommunity.com/attachments/20/20377-1aae88281082616ca221f3ff40be46dc.jpg "[PokeCommunity.com] How To Add, Edit, And Understand Music in Pokeemerald")
For the end of your loop, you will add a "]" text event. Again, looking at Route 101, we can see that there is a "]" placed exactly at the end of measure 17 (ignore the fact that it says measure 16. A fun "quirk" about this software is that, if a measure is small enough like measure 1, it ignores the small measure entirely when it is offscreen):
![[PokeCommunity.com] How To Add, Edit, And Understand Music in Pokeemerald](https://data.pokecommunity.com/attachments/20/20378-dbccb885e3fa9973044c6b77d6ded3d1.jpg "[PokeCommunity.com] How To Add, Edit, And Understand Music in Pokeemerald")
With both of those in place, the .s file that is generated will have a loop established, going from "[" to "]". Looking at the .s file of Route 101, we see this label at the top of measure 2 (labeled as measure 001):
![[PokeCommunity.com] How To Add, Edit, And Understand Music in Pokeemerald](https://data.pokecommunity.com/attachments/20/20379-2dc7e61d05bd1084e80b39f74b04df01.jpg "[PokeCommunity.com] How To Add, Edit, And Understand Music in Pokeemerald")
And then we see the GOTO command here at the end of measure 17 (labeled as measure 016):
![[PokeCommunity.com] How To Add, Edit, And Understand Music in Pokeemerald](https://data.pokecommunity.com/attachments/20/20380-f50412f4f73cb5a44467988a67bb5ce5.jpg "[PokeCommunity.com] How To Add, Edit, And Understand Music in Pokeemerald")
And that's how loops work. Among the easier things to understand when it comes to midis in pokeemerald.
Spoiler:
For the end of your loop, you will add a "]" text event. Again, looking at Route 101, we can see that there is a "]" placed exactly at the end of measure 17 (ignore the fact that it says measure 16. A fun "quirk" about this software is that, if a measure is small enough like measure 1, it ignores the small measure entirely when it is offscreen):
Spoiler:
With both of those in place, the .s file that is generated will have a loop established, going from "[" to "]". Looking at the .s file of Route 101, we see this label at the top of measure 2 (labeled as measure 001):
Spoiler:
And then we see the GOTO command here at the end of measure 17 (labeled as measure 016):
Spoiler:
And that's how loops work. Among the easier things to understand when it comes to midis in pokeemerald.
Using Standard XCMD Commands
Spoiler:
By this point, you may wonder how one would go about using the extended commands to change the voice envelopes mid-song or apply an echo effect to a particular track. You can still do this through the midi, but it is not intuitive whatsoever.
First, you add a Control Change event that is set to 30, and pass in the value of the extended command that you would like to do. Remember, in
![[PokeCommunity.com] How To Add, Edit, And Understand Music in Pokeemerald](https://data.pokecommunity.com/attachments/20/20381-7f8b8266a84b41df184aa1c157ee02bf.jpg "[PokeCommunity.com] How To Add, Edit, And Understand Music in Pokeemerald")
As you can see, this is the Control Change event marked as 30 in MidiEditor, and I have passed in a value of 8.
Second, you add another Control Change event immediately after the first one, this time choosing the event set at 29 or 31, your choice. For the value, pass in the actual value that you want to set the thing to. In our example, I want to set the echo volume to 100, so I will add this event:
![[PokeCommunity.com] How To Add, Edit, And Understand Music in Pokeemerald](https://data.pokecommunity.com/attachments/20/20382-f5ae5b72366b2684499459e169132f63.jpg "[PokeCommunity.com] How To Add, Edit, And Understand Music in Pokeemerald")
By doing this, we will now see an extended command that sets the echo volume to 100 at the same point as that second Control Change event in the generated .s file:
![[PokeCommunity.com] How To Add, Edit, And Understand Music in Pokeemerald](https://data.pokecommunity.com/attachments/20/20383-5c488193bab4a1457f3ae7321fa26135.jpg "[PokeCommunity.com] How To Add, Edit, And Understand Music in Pokeemerald")
If you are hoping to be able to do this with the extened commands that change voice enevelopes, we can't do that....at least with what I have told you so far. The explanation for that, as well as the explanation for the weird steps we had to go through to create a normal extended command, is coming up later.
First, you add a Control Change event that is set to 30, and pass in the value of the extended command that you would like to do. Remember, in
sound/MPlayDef.s, the echo-volume command xIECV has the value of 8, and the echo-length command xIECL has a value of 9. So, if we wanted to change the echo volume, the first event that we would add to the midi would look like this:
Spoiler:
As you can see, this is the Control Change event marked as 30 in MidiEditor, and I have passed in a value of 8.
Second, you add another Control Change event immediately after the first one, this time choosing the event set at 29 or 31, your choice. For the value, pass in the actual value that you want to set the thing to. In our example, I want to set the echo volume to 100, so I will add this event:
Spoiler:
By doing this, we will now see an extended command that sets the echo volume to 100 at the same point as that second Control Change event in the generated .s file:
Spoiler:
If you are hoping to be able to do this with the extened commands that change voice enevelopes, we can't do that....at least with what I have told you so far. The explanation for that, as well as the explanation for the weird steps we had to go through to create a normal extended command, is coming up later.
Using Voice Envelope XCMD Commands (A Look at the .mid → .s process)
Spoiler:
To be able to change any of the voice envelopes mid-song via an extended command requires us to dive into and make some changes to the source code of the mid2agb software, which converts .mid files into .s files. This code can be found in
If we go down to a function titled
This function handles converting Control Change events. Here's a quick bit of variable-name vocab for you:
Looking at some of these commands, you may be able to figure out a few of them. For example, 7 relates to a VOL command, and 10 (or 0x0A in hex) relates to a PAN command. People that haven't worked in C or C++ may be a bit thrown off by how these print commands are formatted, but you can look that up on your own time. A decent tutorial on the C fprintf function should suffice. Here's the formal documentation of the function, which may or may not help depending on how programming-literate you are. If we look at what command we get for a value of 0x1D or 0x1F (29 or 31), we see it calls a function named
Looking at this function, we see that, based on something called
By now, you have the information to understand how we created that echo-volume command in the previous section: We first used the 30 (0x1E) Control Change event to set
So we know how to mess with echo volume and length, but what about the voice envelopes? Well, as this code stands, we can't change those envelopes at all. Thankfully, this code need not stay as it is. To maintain the nice association that the original writer of this code has established between mid2agb and pokeemerald, we should associate the extended commands that change attack, decay, sustain, and release with the numbers 4-7, respectively. To add the attack-change command, we would add case 0x04 to the switch statement in
I used "4" in the
Be aware that there is still an issue with this design: these voice envelopes can range anywhere from 0 to 255, but we can only pass in a number in the Value section of the Control Change event within 0-127. What may end up being more useful is creating something that works more along the lines of the next section of this tutorial.
tools/mid2agb. The file that I'm going to be looking at is agb.cpp. If you want to see how certain things are written in the .s file, take a look through this file and midi.cpp. There's plenty that will look really weird and not make much sense, but some of it will be easy enough to understand without too much foreknowledge.If we go down to a function titled
PrintControllerOp, we see this:
Code:
void PrintControllerOp(const Event& event)
{
    switch (event.param1)
    {
    case 0x01:
        PrintOp(event.time, "MOD   ", "%u", event.param2);
        break;
    case 0x07:
        PrintOp(event.time, "VOL   ", "%u*%s_mvl/mxv", event.param2, g_asmLabel.c_str());
        break;
    case 0x0A:
        PrintOp(event.time, "PAN   ", "c_v%+d", event.param2 - 64);
        break;
    case 0x0C:
    case 0x10:
        PrintMemAcc(event);
        break;
    case 0x0D:
        s_memaccOp = event.param2;
        PrintWait(event.time);
        break;
    case 0x0E:
        s_memaccParam1 = event.param2;
        PrintWait(event.time);
        break;
    case 0x0F:
        s_memaccParam2 = event.param2;
        PrintWait(event.time);
        break;
    case 0x11:
        std::fprintf(g_outputFile, "%s_%u_L%u:\n", g_asmLabel.c_str(), g_agbTrack, event.param2);
        PrintWait(event.time);
        ResetTrackVars();
        break;
    case 0x14:
        PrintOp(event.time, "BENDR ", "%u", event.param2);
        break;
    case 0x15:
        PrintOp(event.time, "LFOS  ", "%u", event.param2);
        break;
    case 0x16:
        PrintOp(event.time, "MODT  ", "%u", event.param2);
        break;
    case 0x18:
        PrintOp(event.time, "TUNE  ", "c_v%+d", event.param2 - 64);
        break;
    case 0x1A:
        PrintOp(event.time, "LFODL ", "%u", event.param2);
        break;
    case 0x1D:
    case 0x1F:
        PrintExtendedOp(event);
        break;
    case 0x1E:
        s_extendedCommand = event.param2;
        // TODO: loop op
        break;
    case 0x21:
    case 0x27:
        PrintByte("PRIO  , %u", event.param2);
        PrintWait(event.time);
        break;
    default:
        PrintWait(event.time);
        break;
    }
}event: an event in the midi. In this context, every event is a Control Change event.param1: the value of the particular Control Change event type, like 1 for Modulation Wheel or 7 for Channel Volume.param2: the value passed in to the Value section of the event.Looking at some of these commands, you may be able to figure out a few of them. For example, 7 relates to a VOL command, and 10 (or 0x0A in hex) relates to a PAN command. People that haven't worked in C or C++ may be a bit thrown off by how these print commands are formatted, but you can look that up on your own time. A decent tutorial on the C fprintf function should suffice. Here's the formal documentation of the function, which may or may not help depending on how programming-literate you are. If we look at what command we get for a value of 0x1D or 0x1F (29 or 31), we see it calls a function named
PrintExtendedOp. Immediately above this PrintControllerOp function, we will find this new function:
Code:
void PrintExtendedOp(const Event& event)
{
    // TODO: support for other extended commands

    switch (s_extendedCommand)
    {
    case 0x08:
        PrintOp(event.time, "XCMD  ", "xIECV , %u", event.param2);
        break;
    case 0x09:
        PrintOp(event.time, "XCMD  ", "xIECL , %u", event.param2);
        break;
    default:
        PrintWait(event.time);
        break;
    }
}s_extendedCommand, we can either do an echo-volume (xIECV) command, an echo-length (xIECL) command, or just enter a wait command. But what sets this s_extendedCommand? If we go back to PrintControllerOp, we can see that, for the Control Change event that relates to 30 (0x1E), we set s_extendedCommand to the value we passed into the event.By now, you have the information to understand how we created that echo-volume command in the previous section: We first used the 30 (0x1E) Control Change event to set
s_extendedCommand to 8, which, according to PrintExtendedOp, relates to the echo-volume command (this is based on how the echo-volume command is associated with 8 within the pokeemerald code, but it didn't necessarily need to be programmed that way. It was just good association on the programmer's part). Then we used the 29 or 31 (0x1D or 0x1F) Control Change event to pass in 100 as the echo volume value and run PrintExtendedOp. A little weird, but once we look at this code, it starts to make sense. If that doesn't make sense, take another look. What comes next won't make sense if you don't understand this.So we know how to mess with echo volume and length, but what about the voice envelopes? Well, as this code stands, we can't change those envelopes at all. Thankfully, this code need not stay as it is. To maintain the nice association that the original writer of this code has established between mid2agb and pokeemerald, we should associate the extended commands that change attack, decay, sustain, and release with the numbers 4-7, respectively. To add the attack-change command, we would add case 0x04 to the switch statement in
PrintExtendedOp, and then add the text for our XCMD command. It would look something like this:
Code:
void PrintExtendedOp(const Event& event)
{
    // TODO: support for other extended commands

    switch (s_extendedCommand)
    {
    case 0x04:
        PrintOp(event.time, "XCMD ", "4 , %u", event.param2);
        break;
    case 0x08:
        PrintOp(event.time, "XCMD  ", "xIECV , %u", event.param2);
        break;
    case 0x09:
        PrintOp(event.time, "XCMD  ", "xIECL , %u", event.param2);
        break;
    default:
        PrintWait(event.time);
        break;
    }
}PrintOp string to access the attack-change command, but if you had added your own constant for it in sound/MPlayDef.s, then feel free to use that instead. With this addition, we can now change the attack envelope of a track in a similar way as we changed the echo volume earlier: 30 Control Change event, this time with a value of 4, then a 29 or 31 Control Change event with whatever value we want to set the attack to. Feel free to add the code for the rest of the voice-envelope commands, so that you have access to them in the future.Be aware that there is still an issue with this design: these voice envelopes can range anywhere from 0 to 255, but we can only pass in a number in the Value section of the Control Change event within 0-127. What may end up being more useful is creating something that works more along the lines of the next section of this tutorial.
Adding Your Own Commands to mid2agb (A Slightly Deeper Look at the .mid → .s Process)
Spoiler:
You may eventually come up with some specific effect that you want to be able to use in a song that is not native to mid2agb. While this is more complicated than what we have discussed before, it is not impossible....depending on the effect, of course. For this example, I'll be trying to implement a direct use of the GOTO command, which is normally only used for looping entire songs in mid2agb.
From what I've seen, the easiest way to add a new event type would be through
1.
2.
3.
We now have the functionality to goto any label we want in the middle of a song! Admittedly this isn't an incredibly useful functionality on its own, but it's a good demonstration of how to utilize a lot of the different elements available to us in mid2agb.
From what I've seen, the easiest way to add a new event type would be through
PrintControllerOp. Simply pick a number from 0 to 127 that has not been used yet and you're off to the races. If, due to a miraculous amount of ingenuity or wastefulness, you use all 128 of those numbers, you could start to use some of the numbers relating to PrintExtendedOp or PrintMemAcc. There are plenty of ways to give yourself more room by having certain Control Change events flow into others like the extended commands, but you really shouldn't need that.1.
Spoiler:
In
More code will be added later, of course, but you might as well pick out your number first.
PrintControllerOp, I'm going to pick 40 (0x28 in hex) as the number for this new GOTO command. I'll add the case near the bottom of the switch statement, like so:
Code:
void PrintControllerOp(const Event& event)
{
    switch (event.param1)
    {
    case 0x01:
............................
    case 0x21:
    case 0x27:
        PrintByte("PRIO  , %u", event.param2);
        PrintWait(event.time);
        break;
    case 0x28:

        break;
    default:
        PrintWait(event.time);
        break;
    }
}2.
Spoiler:
To properly use the GOTO command, it needs to look something like this:
Looking at the first of these two lines, we can just copy the function calls used for looping songs, which is done in
It looks like we just use
We now can cause the first part of the GOTO command to be written anywhere we want in our .s file!.....which isn't all that useful without the second line, and that's the tricky part.
Code:
	.byte	GOTO
.word mus_route101_1_B1PrintAgbTrack:
Code:
void PrintAgbTrack(std::vector<Event>& events)
{
...................
        case EventType::Label:
            PrintSeqLoopLabel(event);
            break;
        case EventType::LoopEnd:
            PrintByte("GOTO");
            PrintWord("%s_%u_B%u", g_asmLabel.c_str(), g_agbTrack, loopEndBlockNum);
....................PrintByte("GOTO"). Simple enough. We add it to our case back in PrintControllerOp, which now looks like this:
Code:
    case 0x28:
        PrintByte("GOTO");
break;3.
Spoiler:
How should we get the label that we want to jump to? I can see two ways of doing this, one that is simpler, and another that is substantially more complex, but is also more educational and shows more potential for complex commands. I'll demonstrate both, so as to satisfy my educational itch.
Regardless of which method you choose, you'll need some extra knowledge regarding how we can add labels to a song normally. If you were to look at the function named
This code is relating to reading text events in the midi and reacting accordingly. We can see the use of "[" and "]" regarding loops, as well as some functionality for "][", interestingly enough. What I want to point out is the situation where the text equals ":". This will, as you might derive from the function call within the else-if statement, create a label. This label will look something like this:
A couple of important things to know about this ":" text event functionality:
- This label will be created at the same point in the same measure in each and every track in the .s file. While we could create our own command to create a label that only appears in one track, that's not what we're doing right now. It's not a problem that the label appears in every track, since the label will be slightly different in each track, and unused labels aren't a problem.
- At least in MidiEditor, text events are associated to particular tracks. For "[", ":", and any other text events that are processed this way, if you associate the event with any track other than Track 0, the text event will not be properly added to the .s file. This may just be a MidiEditor thing, but it's an important thing to be aware of regardless.
We have to consider how we want to write the label into the GOTO command. Looking back at the GOTO section of that
This
Simpler Method:
Complex Method:
Regardless of which method you choose, you'll need some extra knowledge regarding how we can add labels to a song normally. If you were to look at the function named
ReadSeqEvent in midi.cpp, you would eventually come across this section of code:
Code:
// text event
        std::string text = ReadEventText();

        if (text == "[")
            MakeBlockEvent(event, EventType::LoopBegin);
        else if (text == "][")
            MakeBlockEvent(event, EventType::LoopEndBegin);
        else if (text == "]")
            MakeBlockEvent(event, EventType::LoopEnd);
        else if (text == ":")
            MakeBlockEvent(event, EventType::Label);
        else
            return false;
Code:
mus_route101_1_B1mus_route101 is the name of the song.1 relates to which track this label is in.B1 indicates that this is the first label in this track. If it were the second, it would be B2, and so on.A couple of important things to know about this ":" text event functionality:
- This label will be created at the same point in the same measure in each and every track in the .s file. While we could create our own command to create a label that only appears in one track, that's not what we're doing right now. It's not a problem that the label appears in every track, since the label will be slightly different in each track, and unused labels aren't a problem.
- At least in MidiEditor, text events are associated to particular tracks. For "[", ":", and any other text events that are processed this way, if you associate the event with any track other than Track 0, the text event will not be properly added to the .s file. This may just be a MidiEditor thing, but it's an important thing to be aware of regardless.
We have to consider how we want to write the label into the GOTO command. Looking back at the GOTO section of that
PrintAgbTrack function in agb.cpp, we see this:
Code:
void PrintAgbTrack(std::vector<Event>& events)
{
.............
        case EventType::LoopEnd:
            PrintByte("GOTO");
PrintWord("%s_%u_B%u", g_asmLabel.c_str(), g_agbTrack, loopEndBlockNum);PrintWord command seems to be just what we're looking for! This will print a .word label based on several variables. Depending on which method we use, we may copy most of this directly. But regardless of the method, there are some details that this exact function call doesn't handle, like creating a particular label, not just the most recent label or the next label coming up. That's what we'll be looking into with these two methods. Simpler Method:
Spoiler:
With this method, we will be mostly copying that
All of this to say, if we pass in the number of the label that we want to goto (which you can know by counting the number of "[", "][", and ":" text events preceding and including your newly-added label) into the Control Change event, we can take that
With this, we can now create GOTO commands that jump to the proper labels that we indicate!
I'll go through an example of actually using this GOTO command in a midi.
- In your midi file, add a text event with ":" wherever you want to have your label appear. Be aware of which label (in terms of first, second, third, etc.) this would be in the .s file, accounting for all "[", "][", and ":" text events. For an example, I'm going to add a label in measure 3 of the Route 101 theme:
![[PokeCommunity.com] How To Add, Edit, And Understand Music in Pokeemerald](https://data.pokecommunity.com/attachments/20/20384-6f8e508920960dfcbd0c561387af5bdc.jpg "[PokeCommunity.com] How To Add, Edit, And Understand Music in Pokeemerald")
I know that this will be the second label in the song, as the only label before this one is the start of the song's loop, a "[" text event. Remember: a label will now exist in Measure 3 for all of the tracks in this song.
- At the point that you want the GOTO to occur, you will add the Control Change event, set it to the control type that matches the number you set in
![[PokeCommunity.com] How To Add, Edit, And Understand Music in Pokeemerald](https://data.pokecommunity.com/attachments/20/20385-4be49fad337f9b7c2ded54ad1fbbc6f8.jpg "[PokeCommunity.com] How To Add, Edit, And Understand Music in Pokeemerald")
- Now we build our ROM as normal, then take a look at the .s file and see if everything checks out:
![[PokeCommunity.com] How To Add, Edit, And Understand Music in Pokeemerald](https://data.pokecommunity.com/attachments/20/20386-7928e3c2f052aa843b28739f4fe6b80a.jpg "[PokeCommunity.com] How To Add, Edit, And Understand Music in Pokeemerald")
Here, we can see near the top that our label has been added, and then at the bottom, the GOTO command has been properly written!
If you wanted this functionality in mid2agb, this would definitely be the way to do it. The complex method can teach a lot about how mid2agb handles text events, but for this functionality, it's baroque.
PrintWord call. The first two variables that are passed in (g_asmLabel.c_str() and g_agbTrack) are the song name and the track number respectively, which are what we need, but that last part (loopEndBlockNum) may not be what we are looking for, as it is the number of the current label. We might want the 1st label or the 21st label. How can we specify the number of the label that we want? How about through the Control Change event that we're using to do this GOTO command in the first place? We can pass in a number from 0 to 127 through the value of the event, so as long as you don't have more than 127 labels that need GOTOing, we are in good hands. You may remember from earlier that, when we pass a value into a Control Change event, it gets passed into the param2 property of the event variable. All of this to say, if we pass in the number of the label that we want to goto (which you can know by counting the number of "[", "][", and ":" text events preceding and including your newly-added label) into the Control Change event, we can take that
PrintWord call from a little while ago and just swap out the last argument with event.param2 and slap it into our case 0x28 in PrintControllerOp, which should now look like this:
Code:
case 0x28:
        PrintByte("GOTO");
        PrintWord("%s_%u_B%u", g_asmLabel.c_str(), g_agbTrack, event.param2);
break;I'll go through an example of actually using this GOTO command in a midi.
- In your midi file, add a text event with ":" wherever you want to have your label appear. Be aware of which label (in terms of first, second, third, etc.) this would be in the .s file, accounting for all "[", "][", and ":" text events. For an example, I'm going to add a label in measure 3 of the Route 101 theme:
Spoiler:
I know that this will be the second label in the song, as the only label before this one is the start of the song's loop, a "[" text event. Remember: a label will now exist in Measure 3 for all of the tracks in this song.
- At the point that you want the GOTO to occur, you will add the Control Change event, set it to the control type that matches the number you set in
PrintControllerOp, which, for this example, is 40 (or 0x28), determine which track it should be applied to, and then pass in the number of the label that we want to goto, which, in this example is 2. I'm going to have this GOTO occur in Track 1 during Measure 5. In MidiEditor, that will all look like this:
Spoiler:
- Now we build our ROM as normal, then take a look at the .s file and see if everything checks out:
Spoiler:
Here, we can see near the top that our label has been added, and then at the bottom, the GOTO command has been properly written!
If you wanted this functionality in mid2agb, this would definitely be the way to do it. The complex method can teach a lot about how mid2agb handles text events, but for this functionality, it's baroque.
Complex Method:
Spoiler:
With this method, instead of just utilizing the different variables already present in this code, we are going to figure how to pass the entire label as one string into the
The general idea of this method is to pass the entire label name into mid2agb via a text event, and then use that in the
- First
- Second
- Third
- Fourth
I'll go through an example of actually using this GOTO command in a midi.
- In your midi file, add a text event with ":" wherever you want to have your label appear. Be aware of which label (in terms of first, second, third, etc.) this would be in the .s file, accounting for all "[", "][", and ":" text events. For an example, I'm going to add a label in measure 3 of the Route 101 theme:
I know that this will be the second label in the song, as the only label before this one is the start of the song's loop, a "[" text event. Remember: a label will now exist in Measure 3 for all of the tracks in this song.
- THIS STEP IS DIFFERENT THAN IN THE SIMPLE METHOD!!! At the point that you want the GOTO to occur, you will add the Control Change event, set it to the control type that matches the number you set in
![[PokeCommunity.com] How To Add, Edit, And Understand Music in Pokeemerald](https://data.pokecommunity.com/attachments/20/20387-65c9f59bbbf6829ea3e6915aae4f27b2.jpg "[PokeCommunity.com] How To Add, Edit, And Understand Music in Pokeemerald")
Note that the value passed into this event doesn't matter for this method.
- THIS STEP IS DIFFERENT THAN IN THE SIMPLE METHOD!!! At that exact same point, you will add a text event with the text ":" + the exact name of your label. In this example, the text would be
![[PokeCommunity.com] How To Add, Edit, And Understand Music in Pokeemerald](https://data.pokecommunity.com/attachments/20/20388-4e7ce2e7cda286ba7bb6d51447ef64a0.jpg "[PokeCommunity.com] How To Add, Edit, And Understand Music in Pokeemerald")
I will note that, from my testing so far, there is no problem putting the text event at the exact same point in time in the midi as the Control Change event. The fearful part of me makes me wonder if there could be some situation where the Control Change event could be processed before the text event due to them occuring at the exact same time, leading to issues. If you want to definitely avoid that, place the text event juuuuuuust barely before the Control Change event, and you'll definitely be good to go. A little less elegant, but good to go.
- Now we build our ROM as normal, then take a look at the .s file and see if everything checks out:
Here, we can see near the top that our label has been added, and then at the bottom, the GOTO command has been properly written!
If you were to add this functionality to mid2agb, I would not suggest doing it this way. It's a bit overly complex, considering we have variables that hold a lot of this data for us already in the code. However, this method shows us how text events can be used to carry any kind of text data into mid2agb, and from there into the .s file, which can be very useful if we want to do something more specialized or write something very specific into the .s file.
PrintWord call. While this is unecessarily complex for what we're trying to do, it may not be so unecessary for different functionalities that we try to implement, so it's a handy skill to have.The general idea of this method is to pass the entire label name into mid2agb via a text event, and then use that in the
PrintWord call. Seems pretty straight-forward, but there are several changes that we need to make to the mid2agb code for it to be accomadating to our wants. - First
Spoiler:
We need to have a global string that both
We have to add the string library so as to be able to create strings in this file, and then we added a global string named
midi.cpp and agb.cpp can access. This will hold the label. This string can also be used for other commands that you might come up with in the future that require specific strings to be read from text events and written into commands in the .s file. We will go into agb.h and add these lines:
Code:
#include <string>  ← ← ← ←
#include <vector>
#include "midi.h"

void PrintAgbHeader();
void PrintAgbTrack(std::vector<Event>& events);
void PrintAgbFooter();

extern int g_agbTrack;
extern std::string g_labelName; ← ← ← ←g_labelName. Feel free to name it whatever you like, I was just keeping the name topical.
- Second
Spoiler:
We have to get mid2agb to accept a text event with text that has more than 2 characters. If we look at
While you may not understand all of what's in here, you may notice that there's a check to see if the length of something is less than or equal to 2. If it is, it will attempt to read the data, throwing an error if it fails. If the length is greater than 2, then skip over this text event. Since our labels are guranteed to be more than 2 characters, we need to make some changes here.
+ We need to make sure
+ We need to not skip over whatever we're reading if it goes over 2 characters. I prefer to avoid removing code completely from pre-existing stuff like this, so I'll just comment out
+ We need to add our own
This function should now look something like this:
You can still have the added
Again, I just prefer to keep the code as unchanged as possible, so as to avoid accidental errors.
With this, mid2agb will actually read in text events with text longer than 2 characters. We are safe for text that has up to 50 characters in it. However, if we go above that, we may or may not have problems. Due to how strings are stored, we can technically just keep on adding more and more characters, but we start to bleed into other sections of memory, which might be holding important data that gets overwritten. That's why we increase the buffer size so that we know, for 50 characters worth of text, we are safe.
ReadEventText in midi.cpp, we see this function:
Code:
std::string ReadEventText()
{
    char buffer[2];
    std::uint32_t length = ReadVLQ();

    if (length <= 2)
    {
        if (fread(buffer, length, 1, g_inputFile) != 1)
            RaiseError("failed to read event text");
    }
    else
    {
        Skip(length);
        length = 0;
    }

    return std::string(buffer, length);
}+ We need to make sure
buffer has enough space to hold whatever characters we need. Depending on the name of your song, you may need more or less. I went on the safe side and expanded buffer to hold 50 chars.+ We need to not skip over whatever we're reading if it goes over 2 characters. I prefer to avoid removing code completely from pre-existing stuff like this, so I'll just comment out
Skip(length) and length = 0.+ We need to add our own
fread call for situations where the length is greater than 2. This actually requires very little work: just copy the fread call into the else statement.This function should now look something like this:
Code:
std::string ReadEventText()
{
    char buffer[50];
    std::uint32_t length = ReadVLQ();

    if (length <= 2)
    {
        if (fread(buffer, length, 1, g_inputFile) != 1)
            RaiseError("failed to read event text");
    }
    else
    {
        //Skip(length);
        //length = 0;
        fread(buffer, length, 1, g_inputFile);
    }

    return std::string(buffer, length);
}fread go through that error check process if you prefer. If you want, you could just remove the if-else statement entirely and just leave the check to make sure the text was successfully read, making the function look like this:
Code:
std::string ReadEventText()
{
    char buffer[50];
    std::uint32_t length = ReadVLQ();

    if (fread(buffer, length, 1, g_inputFile) != 1)
        RaiseError("failed to read event text");

    return std::string(buffer, length);
}With this, mid2agb will actually read in text events with text longer than 2 characters. We are safe for text that has up to 50 characters in it. However, if we go above that, we may or may not have problems. Due to how strings are stored, we can technically just keep on adding more and more characters, but we start to bleed into other sections of memory, which might be holding important data that gets overwritten. That's why we increase the buffer size so that we know, for 50 characters worth of text, we are safe.
- Third
Spoiler:
We have to figure out a way for mid2agb to understand that we are trying to feed it a label name and store it. We are going to look at the function named
This is the code that reads text events and determines what to do with them. We are going to add our own check here. But how should we indicate that we are passing in a label, since we don't want to hard-code the label that we will be passing in? What I've decided to do is, if I'm passing in a label, I will start the text of the text event with ":", and follow it with the label. This maintains the consistency that ":" is related to labels, but allows us to pass in the entire label along with it. For example, if I knew I wanted the GOTO to goto the second label of the first track of the Route 101 theme, the text event would look something like this:
We can then have the program check to see if the first character is a ":", and if so, read in the rest of the string and store it.
Let's add another else-if statement to handle this check:
With this addition, we check to see if the first character of the text event is a ":". If so, we assign
ReadSeqEvent, where text events are processed. You may recall seeing something like this:
Code:
        if (text == "[")
            MakeBlockEvent(event, EventType::LoopBegin);
        else if (text == "][")
            MakeBlockEvent(event, EventType::LoopEndBegin);
        else if (text == "]")
            MakeBlockEvent(event, EventType::LoopEnd);
        else if (text == ":")
            MakeBlockEvent(event, EventType::Label);
        else
            return false;
Code:
:mus_route101_1_B2Let's add another else-if statement to handle this check:
Code:
        if (text == "[")
            MakeBlockEvent(event, EventType::LoopBegin);
        else if (text == "][")
            MakeBlockEvent(event, EventType::LoopEndBegin);
        else if (text == "]")
            MakeBlockEvent(event, EventType::LoopEnd);
        else if (text == ":")
            MakeBlockEvent(event, EventType::Label);
        else if (text[0] == ':')
            g_labelName = text.substr(1);
        else
return false;g_labelName the substring of text, starting from the second character and going all the way to the end. This will give us the label name without the leading ":".
- Fourth
Spoiler:
We will finally add the
The reason we have to append that
PrintWord call to the code we added earlier in PrintControllerOp in agb.cpp. This is what our 0x28 case willl look like now:
Code:
    case 0x28:
        PrintByte("GOTO");
        PrintWord("%s", g_labelName.c_str());
break;c_str() call is to convert the string into the proper format to be written with this function. Without it, we write gibberish, which is no good. With this, we can now create GOTO commands that jump to the proper labels that we indicate!
I'll go through an example of actually using this GOTO command in a midi.
- In your midi file, add a text event with ":" wherever you want to have your label appear. Be aware of which label (in terms of first, second, third, etc.) this would be in the .s file, accounting for all "[", "][", and ":" text events. For an example, I'm going to add a label in measure 3 of the Route 101 theme:
Spoiler:
I know that this will be the second label in the song, as the only label before this one is the start of the song's loop, a "[" text event. Remember: a label will now exist in Measure 3 for all of the tracks in this song.
- THIS STEP IS DIFFERENT THAN IN THE SIMPLE METHOD!!! At the point that you want the GOTO to occur, you will add the Control Change event, set it to the control type that matches the number you set in
PrintControllerOp, which, for this example, is 40 (or 0x28), and then determine which track it should be applied to. I'm going to have this GOTO occur in Track 1 during Measure 5. In MidiEditor, that will all look like this:
Spoiler:
Note that the value passed into this event doesn't matter for this method.
- THIS STEP IS DIFFERENT THAN IN THE SIMPLE METHOD!!! At that exact same point, you will add a text event with the text ":" + the exact name of your label. In this example, the text would be
:mus_route101_1_B2. That will look like this in the midi editor:
Spoiler:
I will note that, from my testing so far, there is no problem putting the text event at the exact same point in time in the midi as the Control Change event. The fearful part of me makes me wonder if there could be some situation where the Control Change event could be processed before the text event due to them occuring at the exact same time, leading to issues. If you want to definitely avoid that, place the text event juuuuuuust barely before the Control Change event, and you'll definitely be good to go. A little less elegant, but good to go.
- Now we build our ROM as normal, then take a look at the .s file and see if everything checks out:
Spoiler:
Here, we can see near the top that our label has been added, and then at the bottom, the GOTO command has been properly written!
If you were to add this functionality to mid2agb, I would not suggest doing it this way. It's a bit overly complex, considering we have variables that hold a lot of this data for us already in the code. However, this method shows us how text events can be used to carry any kind of text data into mid2agb, and from there into the .s file, which can be very useful if we want to do something more specialized or write something very specific into the .s file.
We now have the functionality to goto any label we want in the middle of a song! Admittedly this isn't an incredibly useful functionality on its own, but it's a good demonstration of how to utilize a lot of the different elements available to us in mid2agb.
That's about all I've got regarding working with .mid files in pokeemerald. It's not exactly my cup of tea, since it requires several extra steps to do stuff that I could just do directly in the .s file, but there are perks to working in a midi editor sometimes, so I can't disregard the .mid entirely.
How to Add a New Song To Your ROM
Spoiler:
So, you found your .mid file, made a .s file based off of the midi, made a voicegroup for the song, and now you want to put it in the game to see how it sounds on the GBA. There are two (technically three) ways of getting a new song into your ROM hack. You can either replace a pre-existing song that's already in the game, or you can insert your new song into the game.
Method 1: Replace A Song
Method 2: Insert A Song
Method 3: Replace & Rename A Song
To actually listen to the song, you can use PoryMap and set some place's music to be your new song. I usually set Littleroot's theme to be my new songs, since that's real close to the beginning of the game. Or, you can replace the music in Professor Birch's opening speech by going into
You can change "MUS_ROUTE122" to whatever the name of your song is, and then your song will play during Professor Birch's opening speech. Make sure to keep the name in all caps, because that's how all the songs' names are spelled and used throughout the other files of the game. Or you could have your song play even earlier by going into
Change "MUS_INTRO" to the filename of your song (in all caps), and the opening song that plays as the game is starting up will be your new song. Just be aware that, once the intro animation gets to the double battle section, a new song will start playing. So unless your song is pretty short, either go with the Professor Birch's Speech method or make a town/route/whatever use your song for background music.
Method 1: Replace A Song
Spoiler:
This is the easiest of the methods, since there are less steps involved. It also consumes less memory from the ROM itself.
1. Choose a song that's already in pokeemerald that you are willing to replace. There are a couple of songs that are unused, and many others that are only used in FireRed/LeafGreen, so they're effectively unused in Emerald. If you replace one of these, you aren't losing that much. You can look through
2. Rename your songs' .mid file to be the exact same name as the files for the song that you're going to replace. (If your version of pokeemerald doesn't have
3. Place your .mid file into
4. Build the ROM. Now your .s file should be in
5. Go into your .s file and make sure every label and variable uses the the name of the file. For example, if you look at the file I used in the prior section of this tutorial as an example, you'll see that "mus_rg_ajito" is all over the place. This is the name of the .s and .mid files of that song.
With that, you have now placed your new song in the ROM! Congratulations!
1. Choose a song that's already in pokeemerald that you are willing to replace. There are a couple of songs that are unused, and many others that are only used in FireRed/LeafGreen, so they're effectively unused in Emerald. If you replace one of these, you aren't losing that much. You can look through
sound/song_table.inc to see all of them, as well as short descriptions of where they play in the game.2. Rename your songs' .mid file to be the exact same name as the files for the song that you're going to replace. (If your version of pokeemerald doesn't have
songs.mk, you'll need to create your .s file via mid2agb and rename it to match the file that you're replacing)3. Place your .mid file into
sound/songs/midi, replacing the prior song that had the same name, and delete the .s file for the prior version of the song. Now, you may be wondering: "Why do I need to add my .mid file? You said the game only looks at the .s files, right?" That is true, but when the ROM is being built, if the .mid file isn't there, the build will crash, since it doesn't have a .mid file to create a .s file with. (If your version of pokeemerald doesn't have songs.mk, also place your new .s file into this folder)4. Build the ROM. Now your .s file should be in
sound/songs/midi. (If your version of pokeemerald doesn't have songs.mk, skip this step)5. Go into your .s file and make sure every label and variable uses the the name of the file. For example, if you look at the file I used in the prior section of this tutorial as an example, you'll see that "mus_rg_ajito" is all over the place. This is the name of the .s and .mid files of that song.
With that, you have now placed your new song in the ROM! Congratulations!
Method 2: Insert A Song
Spoiler:
This is a more complex process than the prior method, since there are more steps involved. The only reason I would use this method is if I was using every single song that's in the game already, but wanted to add more music. Otherwise, adding in a new song rather than replacing one that isn't even used would just be wasting space in the ROM.
1. Make sure your filename has no spaces or parenthesis. If you can just stick with letters, numbers, and underscores, then do that, since that's how all of the other songs' names are written.
2. Add your .mid to
3. Go into
Right below "ph_nurse_solo", type in your song's filename, following the same format as the other songs. Something like:
The first 0 represents which music player you are using. 0 is used for background music, and 1-3 are used for sound effects. Each music player can only be playing one thing at a time, so multiple sound effect players are needed to be able to have multiple sound effects play at once. If you're adding a sound effect, use on of those three sound effect players. The second 0 here has, as of yet, an unknown purpose. It's always the same number as the prior number, so just stick with that.
4. Go into
Right below "PH_NURSE_SOLO", type in your song's filename, following the same format as the other songs, but have your song's number be 610. Something like:
This will allow you to refer to your song in other files, which is necessary to actually play it. The number refers to the position that your song is in
5. Go to
Go all the way to the bottom of this list, where you'll see this:
Add in your song's filename, following the same pattern as the other songs. Something like:
6. Go to
Once you build your ROM, your song will have been successfully added! Congratulations!
1. Make sure your filename has no spaces or parenthesis. If you can just stick with letters, numbers, and underscores, then do that, since that's how all of the other songs' names are written.
2. Add your .mid to
sound/songs/midi. Now, you may be wondering: "Why do I need to add my .mid file? You said the game only looks at the .s files, right?" That is true, but when the ROM is being built, if the .mid file isn't there, the build will crash, since the .s file has yet to be created. (If you're version of pokeemerald doesn't have songs.mk, you'll need to create your .s file via mid2agb and add it into sound/songs/midi along with your .mid file.)3. Go into
sound/song_tables.inc and go all the way to the bottom of the file. You should see this near the bottom:
Code:
	song ph_cure_solo, 2, 2
	song ph_nurse_blend, 2, 2
	song ph_nurse_held, 2, 2
	song ph_nurse_solo, 2, 2
Code:
song thefilenameofyoursong, 0, 04. Go into
include/constants/songs.h, and go all the way down to the bottom of the file, where you'll see this:
Code:
#define PH_NURSE_BLEND              607
#define PH_NURSE_HELD               608
#define PH_NURSE_SOLO               609
Code:
#define YOURSONGFILENAMEINALLCAPS 610sound/song_tables.inc, and since we placed the song just after ph_nurse_solo, your new song's number should be one more than PH_NURSE_SOLO.5. Go to
ld_script.txt and look for the "song_data" section. Once you find it, you should see something like this:
Code:
song_data :
    ALIGN(4)
    {
        sound/songs/midi/mus_dummy.o(.rodata);
        sound/songs/midi/se_use_item.o(.rodata);
        sound/songs/midi/se_pc_login.o(.rodata);
        sound/songs/midi/se_pc_off.o(.rodata);
Code:
        sound/songs/midi/ph_nurse_blend.o(.rodata);
        sound/songs/midi/ph_nurse_held.o(.rodata);
        sound/songs/midi/ph_nurse_solo.o(.rodata);
    } =0
Code:
        sound/songs/midi/ph_nurse_blend.o(.rodata);
        sound/songs/midi/ph_nurse_held.o(.rodata);
        sound/songs/midi/ph_nurse_solo.o(.rodata);
	sound/songs/midi/thenameofyoursongfile.o(.rodata);
    } =0
6. Go to
songs.mk, go to the bottom of the file, and add the data for your song. (If your version of pokeemerald doesn't have songs.mk, skip this step) If you wanted your song to have standard reverb, use voicegroup119, have a master volume of 80, and priority of 1, it would look like this:
Code:
$(MID_SUBDIR)/thenameofyoursongfile.s: %.s: %.mid
$(MID) $< $@ -E -R$(STD_REVERB) -G119 -V080 -P1Method 3: Replace & Rename A Song
Spoiler:
Now, say you reeeeally wanted your song's filename to match the name of the song itself, but you still wanted to save space like the first method does. You can do that as well, but it'll take a few extra steps:
1. Choose a song you're willing to replace. You can look through
2. Make sure your filename has no spaces or parenthesis. If you can just stick with letters, numbers, and underscores, then do that, since that's how all of the other songs' names are written.
3. Go into
4. Go into
5. Go into
Within this list, look for the song that you want to replace. Change the name to your song's filename.
6. Go into
7. Place your .mid file into
8. Build your ROM. You should have your .s file in that folder now. (If you're version of pokeemerald doesn't have
9. Go into your .s file and make sure every label and variable uses the the name of the file. For example, if you look at the file I used in the prior section of this tutorial as an example, you'll see that "mus_rg_ajito" is all over the place. This is the name of the .s and .mid files of that song. Once you have done that, your song is ready to be used! Congratulations!
1. Choose a song you're willing to replace. You can look through
sound/song_table.inc to see all of them, as well as short descriptions of where they play in the game.2. Make sure your filename has no spaces or parenthesis. If you can just stick with letters, numbers, and underscores, then do that, since that's how all of the other songs' names are written.
3. Go into
sound/song_table.inc and look for the name of the song that you want to replace. Change the name to your song's filename.4. Go into
include/constants/songs.h, and look for the name of the song that you want to replace. Change the name to your song's filename in all caps.5. Go into
ld_script.txt and look for "song_data". You should find something like this:
Code:
song_data :
    ALIGN(4)
    {
        sound/songs/midi/mus_dummy.o(.rodata);
....................................................6. Go into
songs.mk, find the section that makes the .s file for the song that you're replacing, and rename it to match your .mid file. Change the -G, -R, and any other values you want to match your song. (If you're version of pokeemerald doesn't have songs.mk, skip this step.)7. Place your .mid file into
sound/songs/midi and delete the .mid and .s files of the song that you are replacing.8. Build your ROM. You should have your .s file in that folder now. (If you're version of pokeemerald doesn't have
songs.mk, you just need to make a .s file for your song via mid2agb and place it in sound/songs/midi along with your .mid file.)9. Go into your .s file and make sure every label and variable uses the the name of the file. For example, if you look at the file I used in the prior section of this tutorial as an example, you'll see that "mus_rg_ajito" is all over the place. This is the name of the .s and .mid files of that song. Once you have done that, your song is ready to be used! Congratulations!
To actually listen to the song, you can use PoryMap and set some place's music to be your new song. I usually set Littleroot's theme to be my new songs, since that's real close to the beginning of the game. Or, you can replace the music in Professor Birch's opening speech by going into
src/main_menu.c and looking for this line:
Code:
PlayBGM(MUS_ROUTE122);src/intro.c and looking for this line:
Code:
m4aSongNumStart(MUS_INTRO);Editing a Song That's in Your ROM
Spoiler:
Say you listened to your song, and you noticed that a particular instrument is a little too loud at a certain part, or maybe you'd rather have this one track play a french horn at one part rather than a trumpet. How would you go about making this change? There are two ways of doing this, and it all comes down to if you're more comfortable editing your .mid file or your .s file.
Method 1: Editing the .mid File
Method 2: Editing the .s File
Build your ROM and give the song another listen. If it sounds good, you've done it! Your song is now perfectly set in your hack. If it's not, make some more edits and listen to it again. A lot of patience goes into adding music to a GBA ROM, since some songs just really don't want to work with you.
Method 1: Editing the .mid File
Spoiler:
This method takes a few more steps than editing the .s file, but the extra steps don't take that much time. If you don't like editing the .s file and are pretty comfortable with a midi editor, this method is the way for you.
1. Open up the .mid file of your song in a midi editor of your choice. I use MidiEditor, since it's free and simple, but to each their own.
2. Make the changes that you want to make. If we keep following the example I gave, you would look for that one section in the song that had a too-loud instrument and lower it's volume a little bit. Then you would go to that other section and make that track use a french horn instead of a trumpet.
3. Once you've made your changes, save your .mid file into
4. Once you have your new .s file (which will be after you build the ROM if you don't run your midi through mid2agb yourself), double check it to make sure it's using the proper voicegroup and all of the voices are correctly assigned. This can be a rather time consuming step if you're voicegroup doesn't match up with your midi editor's instrument set. All of the VOICE commands will be based on where the instruments are placed within your midi editor, and if those instruments aren't in the same positions as they are in your voicegroup, you'll need to go through all of the VOICE commands and change them. You could just make a large voicegroup that has all of the instruments in the same positions as they are in your midi editor. This will make it so that whatever instruments are being used in the .mid file will be accurately used in your .s file, allowing you to skip most of this step. Just make sure to reassign your voicegroup in your new .s file, since it will be using voicegroup000 again after running through mid2agb, or whatever voicegroup you assigned to it in
1. Open up the .mid file of your song in a midi editor of your choice. I use MidiEditor, since it's free and simple, but to each their own.
2. Make the changes that you want to make. If we keep following the example I gave, you would look for that one section in the song that had a too-loud instrument and lower it's volume a little bit. Then you would go to that other section and make that track use a french horn instead of a trumpet.
3. Once you've made your changes, save your .mid file into
sound/songs/midi, replacing the old version of the song, delete your old .s file, and then build your ROM. Sometimes the song will be unchanged in-game after doing this. This can be avoided by deleting the .o file related to your song in build/emerald/sound/songs/midi before building the ROM. Running make clean before building lets you skip deleting the .s and .o files, but it will take a lot longer to build. If your pokemeerald doesn't have songs.mk, instead of just deleting the .s file, run your midi through mid2agb to get a new .s file and place both your .mid and .s file into sound/songs/midi, replacing the old version of your song.4. Once you have your new .s file (which will be after you build the ROM if you don't run your midi through mid2agb yourself), double check it to make sure it's using the proper voicegroup and all of the voices are correctly assigned. This can be a rather time consuming step if you're voicegroup doesn't match up with your midi editor's instrument set. All of the VOICE commands will be based on where the instruments are placed within your midi editor, and if those instruments aren't in the same positions as they are in your voicegroup, you'll need to go through all of the VOICE commands and change them. You could just make a large voicegroup that has all of the instruments in the same positions as they are in your midi editor. This will make it so that whatever instruments are being used in the .mid file will be accurately used in your .s file, allowing you to skip most of this step. Just make sure to reassign your voicegroup in your new .s file, since it will be using voicegroup000 again after running through mid2agb, or whatever voicegroup you assigned to it in
songs.mk if you have that.
Method 2: Editing the .s File
Spoiler:
This method takes less steps than editing the .mid file, but you'll need to be pretty comfortable maneuvering through a .s file to use the method. I like this method more than the .mid method, mainly because most of the changes I make are small but numerous. Those sorts of changes are faster to fix in a .s file than a .mid file.
1. You'll need to locate which track has the elements of the song that you want to change. The best way to do this (in my opinion) is to look at the first notes played in each track while also looking at the .mid file of your song through a midi editor. You can then write down which track goes to which section of the song, thus allowing you to more easily navigate the .s file. You may also be able to just see which tracks are which through your midi editor, allowing you to avoid looking at the notes at the start of each track. After you do this once, you won't have to do it again if you want to make more changes to your song later on, since you'll have all of this info written down.
2. Once you know which track to change, go to that track and make the change. Following the example I gave earlier, let's say Track 3 had that too-loud section and that trumpet at measure 012, and measure 012 looked like this:
You'd go to that measure and edit the VOL command, lowering that 120 to something like 90. If there isn't a VOL command in that measure, just add one yourself that sets the volume to 90. You could also choose to instead lower the velocity of the notes being played instead of changing the VOL command. This can be better when the volume is fine everywhere else except in this one spot. We can lower the velocity of the first note in this measure from 122 to 90. For changing the instrument, you would make a new VOICE command and enter the index where your french horn voice is in your voicegroup. If there's already a VOICE command there, you can just change the value. Let's assume the french horn voice is at index 10 in your voicegroup. After these changes, this measure would look like this:
3. Once your changes are done, save the .s file.
4. After you build the ROM, sometimes the song will be unchanged in-game. This can be avoided by deleting the .o file related to your song in
1. You'll need to locate which track has the elements of the song that you want to change. The best way to do this (in my opinion) is to look at the first notes played in each track while also looking at the .mid file of your song through a midi editor. You can then write down which track goes to which section of the song, thus allowing you to more easily navigate the .s file. You may also be able to just see which tracks are which through your midi editor, allowing you to avoid looking at the notes at the start of each track. After you do this once, you won't have to do it again if you want to make more changes to your song later on, since you'll have all of this info written down.
2. Once you know which track to change, go to that track and make the change. Following the example I gave earlier, let's say Track 3 had that too-loud section and that trumpet at measure 012, and measure 012 looked like this:
Code:
@ 012 -------------------
    .byte	VOL , 120*nameofyoursong_mvl/mxl
    .byte	N20 , Cn2 , v122
    .byte   W24
    .byte	N20
    .byte   W72
Code:
@ 012 -------------------
    .byte	VOL , 120*nameofyoursong_mvl/mxl
    .byte	VOICE , 10
    .byte	N20 , Cn2 , v090
    .byte   W24
    .byte	N20
    .byte   W72
3. Once your changes are done, save the .s file.
4. After you build the ROM, sometimes the song will be unchanged in-game. This can be avoided by deleting the .o file related to your song in
build/emerald/sound/songs/midi before building the ROM. Running make clean before building lets you skip deleting the .o files, but it will take a lot longer to build. You will also need to edit the MakeFile to make sure it doesn't delete .s files in sound/songs/midi.
Build your ROM and give the song another listen. If it sounds good, you've done it! Your song is now perfectly set in your hack. If it's not, make some more edits and listen to it again. A lot of patience goes into adding music to a GBA ROM, since some songs just really don't want to work with you.
Limitations of the GBA (And How to Get Past Some of Them)
Spoiler:
By this point, you should have all the tools you need to insert just about any song you want into your ROM hack (assuming you can get your hands on a .mid file of the song you want to add). But, the GBA wasn't exactly the most powerful console, so there are some limitations to be aware of. I have this post to thank for inspiring me to look for ways to break some of these limits.
1. You can only play 1 note from a Square voice at a time. If you try to play multiple at once, the higher pitched note will be the only note that plays. The same is true for Square2, ProgrammableWave, and Noise voices.
2. You can only have up to 10 tracks in a single song. Any tracks higher than 10 will be completely silent when you listen to them on the GBA. This limit can be broken, however. This process will be different if you are using an old version or a not-so-old version of pokeemerald. For the not-so-old version, go to
And that's it. This will allocate the necessary space for the extra tracks and will increase the track count.
If you're using an older version of pokeemerald, jump into
Then head over to src/m4a_1.s and make this change:
With those changes, you will be able to have up to 16 tracks in your songs instead of just 10! Technically speaking, you could try pushing this further, but since it appears that this is the max for most GBA games, I wouldn't be surprised if the music started to sound awful if you tried. You would need to change the files I just mentioned, as well as increase the MAX_MUSICPLAYER_TRACKS constant in
3. You can only play up to 5 notes from Directsound voices at a time. If you try to play more, the 5 highest pitched notes will be the only ones to make sound. This is extremally limiting, especially if you have a drum kit in your song that is constantly using a kick, tom/snare, and high-hat/crash. However, this limit can actually be loosened quite a bit. If you go into
If you change that 5 to a 12, you will now be able to play 12 notes from Directsound voices at once.
BE WARNED: This does take up some IWRAM, which may cause some glitches if you're already using up a lot of it. If you follow this tutorial and upgrade your sound mixer, you can increase the number of directsound voices without fearing glitches. It's a bit complex, but it will help you improve the quality of your instrument samples, remove any background noise, and even allows you to play up to 15 directsound notes at once, with a little finagling here and there. The process of increasing that limit is a bit different, but it involves making this change to the mixer, and setting
1. You can only play 1 note from a Square voice at a time. If you try to play multiple at once, the higher pitched note will be the only note that plays. The same is true for Square2, ProgrammableWave, and Noise voices.
2. You can only have up to 10 tracks in a single song. Any tracks higher than 10 will be completely silent when you listen to them on the GBA. This limit can be broken, however. This process will be different if you are using an old version or a not-so-old version of pokeemerald. For the not-so-old version, go to
sound/music_player_table.inc and make this change:
Code:
.equiv NUM_TRACKS_BGM, 10
                       ↓↓
.equiv NUM_TRACKS_BGM, 16If you're using an older version of pokeemerald, jump into
sound/music_player_table.inc and make this change:
Code:
music_player gMPlayInfo_BGM, gMPlayTrack_BGM, 10, 0
                                               ↓
music_player gMPlayInfo_BGM, gMPlayTrack_BGM, 16, 0
Code:
gMPlayTrack_BGM:
    .space 0x320 ←

gMPlayTrack_BGM:
.space 0x500 ←include/gba/m4a_internal.h if you wanted to give this a whirl. Don't say I didn't warn you.3. You can only play up to 5 notes from Directsound voices at a time. If you try to play more, the 5 highest pitched notes will be the only ones to make sound. This is extremally limiting, especially if you have a drum kit in your song that is constantly using a kick, tom/snare, and high-hat/crash. However, this limit can actually be loosened quite a bit. If you go into
src/m4a.c, you can find this line:
Code:
| (5 << SOUND_MODE_MAXCHN_SHIFT));BE WARNED: This does take up some IWRAM, which may cause some glitches if you're already using up a lot of it. If you follow this tutorial and upgrade your sound mixer, you can increase the number of directsound voices without fearing glitches. It's a bit complex, but it will help you improve the quality of your instrument samples, remove any background noise, and even allows you to play up to 15 directsound notes at once, with a little finagling here and there. The process of increasing that limit is a bit different, but it involves making this change to the mixer, and setting
MAX_DIRECTSOUND_CHANNELS to 15 in constants/m4a_constants.inc and include/gba/m4a_internal.h.With all of this knowledge at your disposal, you should be able to add all sorts of songs to your ROM hack. To wrap this tutorial up in a nice bow, I'll actually walk through adding a song into my own ROM hack, from beginning to end.
Full Step-by-Step Example
Spoiler:
Well, first things first, I've gotta choose what song I want to add in. I decided to go with Wind Scene from Chrono Trigger (absolutely fantastic game, can't recommend it highly enough, whether on DS, SNES, or whatever). If you want to listen to the original, here it is.
Next, I went searching for a .mid file of Wind Scene. I eventually find one at this site, and download it.
With my .mid acquired, I open it up in my midi editor to give it a listen and see if anything is obviously off with it. (I won't be having any pictures for any midi editor steps, since some people may use a different midi editor than me, which can lead to further confusion.) As I listen through it, I notice that there are a few instruments in this song that aren't native to pokeemerald: pan flute, acoustic bass, and reverse cymbal. The pan flute can be swapped out for a normal flute, and most people won't notice much of a difference. You can also go with a shakuhachi, if you are so inclined. I can get a sample for an acoustic bass voice pretty easily, since acoustic bass is in the full GBA soundfont, but just not in pokeemerald. The reverse cymbal, however, will require a bit of finesse. I could just look around for a reverse cymbal sample and throw that into the ROM, but I think I can immitate a reverse cymbal with the percussion already in the ROM. I happen to know that there are a few cymbal crashes that have a low Attack envelope within voicegroup002. If I play multiple notes with this voice while slowly increasing the velocity of each note, it will feel a lot like a reverse cymbal. I also notice that the percussion tracks in the midi don't match up to the original song. It should be using a tambourine and a wood block, but it sounds like a bongo is being used instead of a wood block. I also know that my midi editor's drum set doesn't match up with pokeemerald's drum set, so the tambourine is going to sound wrong in the ROM as it is. The midi also uses tremolo strings in a later part of the song, but I feel that a normal string ensemble would sound nicer. Finally, I can see that the song repeats itself several times throughout the midi, so I can just delete the repeats to make the file smaller. I cut out everything except measures 1-33.
Once my analysis is complete, I make the changes that I can within my midi editor. I swap the pan flute for a normal flute, adjust the percussion notes to match the tambourine and low block notes in the percussion set in pokeemerald (Cs0 for the tambourine and Fs-2 for the block), and switch the tremolo strings to a normal string ensemble. I delete the single reverse cymbal note and replace it with several cymbal notes from that one low-attack cymbal voice in the percussion set in pokeemerald. That voice is placed at note Cn3 within the voice_keysplit_all, so I place my notes there.
I then move on to creating the new instrument I'll need for this song: acoustic bass. I get the acoustic bass sample from the GBA. Sadly, it's in a .wav format, not a .aif format. If I were real lucky and it was in .aif format, then I could just throw it directly into the ROM and that would be the end of it, since it already had loop points. I take my sample into Adobe Premiere Pro and manually loop my sample (don't ask me why I use Premiere for audio editing instead of normal audio software like Audacity or Audition. It's weird, but I'm just used to it), making it 10 seconds. Again, 5 seconds is probably fine, but I'm always a bit nervous about having it be too short. I export it as a .aiff file, making sure it uses mono channels and is 8-bit, uncommpressed.
I take my looped sample and throw it into
I try building the ROM just to see if the sample worked, and.....alas, it did not. Sometimes it does, sometimes it doesn't. I take my .aif file into Audacity and choose File/Export/Export Audio. Then set the save type to be "Other uncompressed files", the header to be "AIFF (Apple/SGI)", and the encoding to be "Signed 8-bit PCM". I throw this new .aiff file into
I go into my voicegroup, which I've named voicegroupmidi, and add my acoustic bass instrument into it:
And now, I send my .mid file through mid2agb, and get a .s file. Now the real work begins.
I open the .s file and set my voicegroup to be voicegroupmidi:
I then take a quick glance through the VOICE commands, comparing the values to the instrument they correlate to, just in case something was off. But, as I expected, everything transferred over fine....except the reverse cymbal track, for some reason. mid2agb forgot to give this track a VOICE command. Not a big deal, since it's a quick-n-easy fix, but good thing I caught it:
Now it's time to add the song to the ROM so as to listen to it. I'm just going to be replacing my mus_rg_ajito song, since that's my habit. However, I'll show what I would do as if I went through each of the other methods, just to be as comprehensive as possible.
Method 1: Replace a Song
Method 2: Insert a Song
Method 3: Replace & Rename a Song
With the song in my ROM, I decide to make Littleroot Town's theme be Wind Scene. I go into PoryMap, click on the "Header" tab, and type in "MUS_RG_AJITO" into the song section. (If you used Method 2 or 3 for adding the song, you would instead type "MUS_WIND_SCENE"). Or, if you wanted to listen to the song during Professor Birch's speech instead, you could go into
And switch it to this:
With the song now in place, I build my ROM, and as long as I followed all of those steps, it should build successfully. I give it a listen, and.....it still has some work. Here's how it sounds currently.
I write down the different things that I notice could be fixed:
The string ensemble gets a bit loud, especially during the high part.
Bass is too low pitched.
The reverse cymbals timing doesn't sound quite right.
The wood block feels just a little too loud for my tastes.
There should be reverb like in the original song.
With these notes in mind, I open up the .s file of the song and set to work. (I'm not going to give an example of how you would go about this in a midi editor, due to the fact that everyone may use a different editor, and I am far more comfortable with editing the .s file.)
I glance through the tracks, comparing them to the tracks labeled in the midi editor, and write down which instruments go to which track.
I then start with the easier changes, and leave the more time consuming ones for later. I first go up to the top of my file and give it a reverb value. We'll start with.....50:
I build the ROM and give it another listen. Better, but I'd like a bit more. After several instances of me tweaking the reverb and listening, I land on a reverb value of 80:
Here's how it sounds now.
I then go to the track that has the wood block and decrease the velocity of each wood block note by 10:
Notice how I added in a new velocity element to the Cs0 note command. If I didn't add that, I would be decreasing both the wood block (FsM2) and the tambourine (Cs0) sound, even though I only wanted to decrease the tambourine. This is the danger that the GBA's optimized programming brings. It's easy to miss stuff like that, so be careful.
I give it a listen, and it sounds good! It's not a dramatic change, but I like it a bit more. Here's how it sounds.
I experiment a bit with the cymbals, trying to time the cymbal sounds a bit better. I eventually come up with this after several attempts:
With that, I feel a bit more comfortable. Here's how the cymbals sound.
The bass is also a quick fix. I decide to shift the bass track up an octave by editing the normally useless KEYSH command at the top of the bass track. I also made the bass a bit louder by maxing out the velocity of each note:
Now the bass sounds quite nice. Here's how it sounds.
That leaves me with the strings. I bounce around some ideas, maybe lowering the strings down an octave during the high parts, maybe swapping in some other voices for that part, but I eventually decide to decrease the initial VOL commands of all of the tracks except one of the percussion tracks, since I started noticing that several of the other tracks also seemed to be just a bit too loud. I add a VOL command for each track that becomes a string ensemble voice and lower their volume substantially. Then, during the high-pitched portion, I edit the velocities of each of the individual notes, making them quieter when they go higher. That way, the shrillness of the note is gone, making those high notes actually sound quite nice. (These edits span a much larger portion of the .s file than the prior edits, so I won't be showing the differences. You can compare the two attached .s files to see the changes.)
Here's how it sounds.
And with that....I feel comfortable calling this a finished product! All I've got to do now is loop the song. In some midis, there will be a comment or bit of text that will indicate where the loop of a song starts and ends. Unfortunately, the midi that I downloaded does not have that. On the upside, it's very obvious where this song loops. I can see that at measure 33 (or 032 in the .s file), the first two notes that are played are the same first two notes played at the beginning of the song. I can just go into each track and create a label at the top of measure 000, like this:
I then go down to measure 032 of each track and add a GOTO command that sends the track back up to these labels like this:
(I also delete any commands that are in this measure aside from FINE, since they won't be needed anymore)
I (and potentially you, if you felt like following along in your own ROM) have successfully added Wind Scene from Chrono Trigger (again, go and play that game when you get the time) into my ROM hack! I may come back to this song later if I happen to feel like I made the strings a bit too quiet or the cymbals too loud or whatever, but for now, I feel good! A large part of editing these songs in your ROM hack (or music in general, I'd imagine) is knowing when to call it good enough.
I hope this step-by-step guide gave you a decent insight on my music-making process. Remember, there was a great deal of time spent experimenting that isn't shown here. It may seem like each step was simple and obvious, but sometimes it takes awhile before you can get just one thing sounding the way you want it to. I'll attach the initial and final .s files so you can see the comparison (the initial file will be in the state after I swapped every "wind_scene" for "mus_rg_ajito", swapped in my custom voicegroup, and made sure the reverse cymbal track had a VOICE command at the start), as well as use this song yourself in your own ROM hack if you like. Remember, you'll need to create your own voicegroup for this song, since I'm using my custom "voicegroupmidi". At the top of both files, I'll write down what instrument is equal to each VOICE command value. I also named the files "wind_scene_initial/final", but the labels within the files use "mus_rg_ajito", so you'll need to change either the filename or the labels within the file if you want to use this song.
Next, I went searching for a .mid file of Wind Scene. I eventually find one at this site, and download it.
With my .mid acquired, I open it up in my midi editor to give it a listen and see if anything is obviously off with it. (I won't be having any pictures for any midi editor steps, since some people may use a different midi editor than me, which can lead to further confusion.) As I listen through it, I notice that there are a few instruments in this song that aren't native to pokeemerald: pan flute, acoustic bass, and reverse cymbal. The pan flute can be swapped out for a normal flute, and most people won't notice much of a difference. You can also go with a shakuhachi, if you are so inclined. I can get a sample for an acoustic bass voice pretty easily, since acoustic bass is in the full GBA soundfont, but just not in pokeemerald. The reverse cymbal, however, will require a bit of finesse. I could just look around for a reverse cymbal sample and throw that into the ROM, but I think I can immitate a reverse cymbal with the percussion already in the ROM. I happen to know that there are a few cymbal crashes that have a low Attack envelope within voicegroup002. If I play multiple notes with this voice while slowly increasing the velocity of each note, it will feel a lot like a reverse cymbal. I also notice that the percussion tracks in the midi don't match up to the original song. It should be using a tambourine and a wood block, but it sounds like a bongo is being used instead of a wood block. I also know that my midi editor's drum set doesn't match up with pokeemerald's drum set, so the tambourine is going to sound wrong in the ROM as it is. The midi also uses tremolo strings in a later part of the song, but I feel that a normal string ensemble would sound nicer. Finally, I can see that the song repeats itself several times throughout the midi, so I can just delete the repeats to make the file smaller. I cut out everything except measures 1-33.
Once my analysis is complete, I make the changes that I can within my midi editor. I swap the pan flute for a normal flute, adjust the percussion notes to match the tambourine and low block notes in the percussion set in pokeemerald (Cs0 for the tambourine and Fs-2 for the block), and switch the tremolo strings to a normal string ensemble. I delete the single reverse cymbal note and replace it with several cymbal notes from that one low-attack cymbal voice in the percussion set in pokeemerald. That voice is placed at note Cn3 within the voice_keysplit_all, so I place my notes there.
I then move on to creating the new instrument I'll need for this song: acoustic bass. I get the acoustic bass sample from the GBA. Sadly, it's in a .wav format, not a .aif format. If I were real lucky and it was in .aif format, then I could just throw it directly into the ROM and that would be the end of it, since it already had loop points. I take my sample into Adobe Premiere Pro and manually loop my sample (don't ask me why I use Premiere for audio editing instead of normal audio software like Audacity or Audition. It's weird, but I'm just used to it), making it 10 seconds. Again, 5 seconds is probably fine, but I'm always a bit nervous about having it be too short. I export it as a .aiff file, making sure it uses mono channels and is 8-bit, uncommpressed.
I take my looped sample and throw it into
sound/direct_sound_samples, naming it "acousticbass48.aif", since the sample's note is C2, which is the 48th pitch in pokeemerald. I go into sound/direct_sound_data.inc and add this to the end of the file:
Code:
.align 2
acousticbass48::
.incbin "sound/direct_sound_samples/acousticbass48.bin"sound/direct_sound_data.inc, rename this file to be "acousticbass48.aif", and then build the ROM again. This time, we have success! Our new instrument is now in!I go into my voicegroup, which I've named voicegroupmidi, and add my acoustic bass instrument into it:
Code:
voice_directsound 60, 0, acousticbass48, 255, 253, 0, 188 @ acoustic bassAnd now, I send my .mid file through mid2agb, and get a .s file. Now the real work begins.
I open the .s file and set my voicegroup to be voicegroupmidi:
Code:
Original
.include "MPlayDef.s"

	.equ	wind_scene_grp, voicegroup000

Change
.include "MPlayDef.s"

	.equ	wind_scene_grp, voicegroupmidi
Code:
Original
@**************** Track 8 (Midi-Chn.10) ****************@

mus_rg_ajito_8:
	.byte		VOL   , 97*wind_scene_mvl/mxv
	.byte	KEYSH , wind_scene_key+0

Change
@**************** Track 8 (Midi-Chn.10) ****************@

mus_rg_ajito_8:
	.byte		VOL   , 97*wind_scene_mvl/mxv
	.byte		VOICE , 96
	.byte	KEYSH , wind_scene_key+0
Now it's time to add the song to the ROM so as to listen to it. I'm just going to be replacing my mus_rg_ajito song, since that's my habit. However, I'll show what I would do as if I went through each of the other methods, just to be as comprehensive as possible.
Method 1: Replace a Song
Spoiler:
First, I rename my .mid and .s files to be "mus_rg_ajito".
Next, I go through my .s file and change every instance of "wind_scene" to "mus_rg_ajito". (This step can be skipped by naming your .mid file "mus_rg_ajito" before sending it through mid2agb)
Then, I stick them into
Next, I go through my .s file and change every instance of "wind_scene" to "mus_rg_ajito". (This step can be skipped by naming your .mid file "mus_rg_ajito" before sending it through mid2agb)
Then, I stick them into
sound/songs/midi, replacing the current mus_rg_ajito.
Method 2: Insert a Song
Spoiler:
First, I go into
Next, I hop over to
After that, I head over to
I double check to make sure my .mid and .s files are named "mus_wind_scene".
I go through my .s file and change every instance of "wind_scene" to "mus_wind_scene". (This step can be skipped by naming your .mid file "mus_wind_scene" before sending it through mid2agb, or by naming your song "wind_scene" instead of "mus_wind_scene" in
Finally, I place my .mid and .s files in
sound/song_table.inc and add in my song at the end of the list:
Code:
	song ph_nurse_solo, 2, 2
song mus_wind_scene, 0, 0include/constants/songs.h and add in my song at the end of the list:
Code:
#define PH_NURSE_SOLO 609
#define MUS_WIND_SCENE 610ld_script.txt and add in my song at the end of the song_data list:
Code:
	sound/songs/midi/ph_nurse_solo.o(.rodata);
	sound/songs/midi/mus_wind_scene.o(.rodata);
    } =0
I go through my .s file and change every instance of "wind_scene" to "mus_wind_scene". (This step can be skipped by naming your .mid file "mus_wind_scene" before sending it through mid2agb, or by naming your song "wind_scene" instead of "mus_wind_scene" in
sound/song_table.inc and include/constants/songs.h. I just add the "mus_" to make it more similar to the other songs already in pokeemerald.)Finally, I place my .mid and .s files in
sound/songs/midi.
Method 3: Replace & Rename a Song
Spoiler:
First, I go into
(I'm using an older version of pokeemerald, so this song is probably named different for you if you're using a more up-to-date version.)
Once I've found it, I rename it to fit my song:
Next, I hop over to
Once found, I change the name to fit my song:
After that, I head over to
Once found, I change it to match my song:
I double check to make sure my .mid and .s files are named "mus_wind_scene".
I go through my .s file and change every instance of "wind_scene" to "mus_wind_scene". (This step can be skipped by naming your .mid file "mus_wind_scene" before sending it through mid2agb, or by naming your song "wind_scene" instead of "mus_wind_scene" in
Nearing the end, I place my .mid and .s files in
Finally, I delete the .mid and .s files of mus_rg_ajito.
sound/song_table.inc and look for "MUS_RG_AJITO":
Code:
#define MUS_RG_AJITO 486Once I've found it, I rename it to fit my song:
Code:
#define MUS_WIND_SCENE 486inclue/constants/songs.h and look for "mus_rg_ajito":
Code:
song mus_rg_ajito, 0, 0 @ Rocket Hideout (FRLG)
Code:
song mus_wind_scene, 0, 0 @ Rocket Hideout (FRLG)ld_script.txt and look for "mus_rg_ajito" within the song_data list:
Code:
sound/songs/midi/mus_rg_ajito.o(.rodata);
Code:
sound/songs/midi/mus_wind_scene.o(.rodata);I go through my .s file and change every instance of "wind_scene" to "mus_wind_scene". (This step can be skipped by naming your .mid file "mus_wind_scene" before sending it through mid2agb, or by naming your song "wind_scene" instead of "mus_wind_scene" in
sound/song_table.inc and include/constants/songs.h. I just add the "mus_" to make it more similar to the other songs already in pokeemerald.)Nearing the end, I place my .mid and .s files in
sound/songs/midi.Finally, I delete the .mid and .s files of mus_rg_ajito.
With the song in my ROM, I decide to make Littleroot Town's theme be Wind Scene. I go into PoryMap, click on the "Header" tab, and type in "MUS_RG_AJITO" into the song section. (If you used Method 2 or 3 for adding the song, you would instead type "MUS_WIND_SCENE"). Or, if you wanted to listen to the song during Professor Birch's speech instead, you could go into
src/main_menu.c, and look for:
Code:
PlayBGM(MUS_ROUTE122);
Code:
PlayBGM(MUS_RG_AJITO);
or
PlayBGM(MUS_WIND_SCENE);I write down the different things that I notice could be fixed:
The string ensemble gets a bit loud, especially during the high part.
Bass is too low pitched.
The reverse cymbals timing doesn't sound quite right.
The wood block feels just a little too loud for my tastes.
There should be reverb like in the original song.
With these notes in mind, I open up the .s file of the song and set to work. (I'm not going to give an example of how you would go about this in a midi editor, due to the fact that everyone may use a different editor, and I am far more comfortable with editing the .s file.)
I glance through the tracks, comparing them to the tracks labeled in the midi editor, and write down which instruments go to which track.
I then start with the easier changes, and leave the more time consuming ones for later. I first go up to the top of my file and give it a reverb value. We'll start with.....50:
Code:
mus_rg_ajito_rev, reverb_set+50
or
mus_wind_scene_rev, reverb_set+50
Code:
mus_rg_ajito_rev, reverb_set+80
or
mus_wind_scene_rev, reverb_set+80I then go to the track that has the wood block and decrease the velocity of each wood block note by 10:
Code:
Original
mus_rg_ajito_7_001:
	.byte	W24
	.byte		N19   , FsM2, v092
	.byte	W48
	.byte		        Cs0
	.byte	W24
	.byte	PEND

Change
mus_rg_ajito_7_001:
	.byte	W24
	.byte		N19   , FsM2, v082
	.byte	W48
	.byte		        Cs0 , v092
	.byte	W24
.byte PENDI give it a listen, and it sounds good! It's not a dramatic change, but I like it a bit more. Here's how it sounds.
I experiment a bit with the cymbals, trying to time the cymbal sounds a bit better. I eventually come up with this after several attempts:
Code:
Original
	.byte	W48
	.byte		N06   , Cn3 , v100
	.byte	W06
	.byte		N05
	.byte	W05
	.byte		N06
	.byte	W06
	.byte		N06
	.byte	W07
	.byte		N05
	.byte	W05
	.byte		N06
	.byte	W06
	.byte		N06
	.byte	W06
	.byte		N06
	.byte	W07
@ 008   ----------------------------------------
	.byte		N06
	.byte	W06
	.byte		N06
	.byte	W90

Change
	.byte	W48
	.byte		N10 ,        Cn3 , v057
	.byte	W05
	.byte		N11 ,        Cn3 , v067
	.byte	W05
	.byte		N13 ,        Cn3 , v077
	.byte	W05
	.byte		N14 ,        Cn3 , v087
	.byte	W05
	.byte		N16 ,        Cn3 , v097
	.byte	W05
	.byte		N17 ,        Cn3 , v107
	.byte	W05
	.byte		N19 ,        Cn3 , v117
	.byte	W05
	.byte		N20 ,        Cn3 , v127
	.byte	W13
@ 008   ----------------------------------------
.byte W96The bass is also a quick fix. I decide to shift the bass track up an octave by editing the normally useless KEYSH command at the top of the bass track. I also made the bass a bit louder by maxing out the velocity of each note:
Code:
Original
@**************** Track 6 (Midi-Chn.6) ****************@

mus_rg_ajito_6:
	.byte	KEYSH , mus_rg_ajito_key+0
@ 000   ----------------------------------------
	.byte		VOICE , 32
	.byte		VOL   , 127*mus_rg_ajito_mvl/mxv
	.byte		PAN   , c_v-10
	.byte	W48
	.byte		N32   , Dn1 , v092

Change
@**************** Track 6 (Midi-Chn.6) ****************@

mus_rg_ajito_6:
	.byte	KEYSH , mus_rg_ajito_key+12
@ 000   ----------------------------------------
mus_rg_ajito_6_000:
	.byte		VOICE , 32
	.byte		VOL   , 127*mus_rg_ajito_mvl/mxv
	.byte		PAN   , c_v-10
	.byte	W48
.byte N32 , Dn1 , v127That leaves me with the strings. I bounce around some ideas, maybe lowering the strings down an octave during the high parts, maybe swapping in some other voices for that part, but I eventually decide to decrease the initial VOL commands of all of the tracks except one of the percussion tracks, since I started noticing that several of the other tracks also seemed to be just a bit too loud. I add a VOL command for each track that becomes a string ensemble voice and lower their volume substantially. Then, during the high-pitched portion, I edit the velocities of each of the individual notes, making them quieter when they go higher. That way, the shrillness of the note is gone, making those high notes actually sound quite nice. (These edits span a much larger portion of the .s file than the prior edits, so I won't be showing the differences. You can compare the two attached .s files to see the changes.)
Here's how it sounds.
And with that....I feel comfortable calling this a finished product! All I've got to do now is loop the song. In some midis, there will be a comment or bit of text that will indicate where the loop of a song starts and ends. Unfortunately, the midi that I downloaded does not have that. On the upside, it's very obvious where this song loops. I can see that at measure 33 (or 032 in the .s file), the first two notes that are played are the same first two notes played at the beginning of the song. I can just go into each track and create a label at the top of measure 000, like this:
Code:
@**************** Track 1 (Midi-Chn.1) ****************@

mus_rg_ajito_1:
	.byte	KEYSH , mus_rg_ajito_key-0
@ 000   ----------------------------------------
mus_rg_ajito_1_000:
	.byte	TEMPO , 88*mus_rg_ajito_tbs/2
Code:
@ 032   ----------------------------------------
	.byte	GOTO
	.word	mus_rg_ajito_1_000
.byte FINEI (and potentially you, if you felt like following along in your own ROM) have successfully added Wind Scene from Chrono Trigger (again, go and play that game when you get the time) into my ROM hack! I may come back to this song later if I happen to feel like I made the strings a bit too quiet or the cymbals too loud or whatever, but for now, I feel good! A large part of editing these songs in your ROM hack (or music in general, I'd imagine) is knowing when to call it good enough.
I hope this step-by-step guide gave you a decent insight on my music-making process. Remember, there was a great deal of time spent experimenting that isn't shown here. It may seem like each step was simple and obvious, but sometimes it takes awhile before you can get just one thing sounding the way you want it to. I'll attach the initial and final .s files so you can see the comparison (the initial file will be in the state after I swapped every "wind_scene" for "mus_rg_ajito", swapped in my custom voicegroup, and made sure the reverse cymbal track had a VOICE command at the start), as well as use this song yourself in your own ROM hack if you like. Remember, you'll need to create your own voicegroup for this song, since I'm using my custom "voicegroupmidi". At the top of both files, I'll write down what instrument is equal to each VOICE command value. I also named the files "wind_scene_initial/final", but the labels within the files use "mus_rg_ajito", so you'll need to change either the filename or the labels within the file if you want to use this song.
And with that.....I think I've said just about everything I can say on ROM music editing. If I come across any new insights on better methods or greater understanding on how different commands work, or if someone else posts something that explains an element of music hacking that I couldn't explain originally, I'll add it in to this tutorial. I hope this tutorial will spark a lot of people's musical interest and introduce all sorts of new songs into ROM hacks. I can't wait to see, or should I say hear, what you guys come up with!
Attachments
Last edited: